...And, well, I'll show off some pretty spit-up cloths, too. :)
I'm sorry for posting late, we've been taken out by seasonal allergies. I've hardly done any sewing this week.
I finally finished my friend's spit-up cloths for her baby girl. I had tons of fun picking out fabrics and playing with the gorgeous colors. This sweet baby girl is going to have not only great, practical spit-up cloths, but also soft terry-backed cloths with ruffles and ribbon tabs. She also got the chenille cloths I made a while ago.
These more practical spit-up cloths are made from a panel of flannel sewn onto a cloth diaper. How big you make the flannel is up personal preference, but I like to cut my flannel to 19 inches long by 7 inches wide. This is just big enough to cover the center, extra-layered part of the cloth diaper after all the raw edges have been turned under.
Iron the long sides under and attach a ribbon along the edge. I like to use satin 3/8inch ribbon, but wider ribbon could be fun and grosgrain works well, too.
Then attach the whole thing to the cloth diaper. Easy as pie! Make sure your bobbin thread matches the cloth diaper's color. If your tension is balanced, then neither should show up on the other side.
Pink on top!
White on the bottom!
All done! So easy and cute!
Here's my stack!
The other set has ruffles and ribbon tabs--perfect for little hands to enjoy.
So fun!
Which one is your favorite?
~Regina
Showing posts with label easy. Show all posts
Friday, March 16, 2012
Thursday, November 3, 2011
Fall Leaf Stained Glass
A fun project to do with a little person!
We went out on a walk and collected a bunch of pretty leaves. Then we ironed the leaves between pieces of wax paper (iron on high, no steam--make sure to cover the wax paper with cloth on both sides!). Once the leaves were nice, flat, and dry, we were ready to use them.
I laid out a nice sheet of clear contact paper, sticky side up, and taped the edges down with painters' tape. We laid the leaves out on it.
Then we took off the painters' tape, stuck the contact paper to the window, smoothed it out and we were done!
Our little girl was so proud of herself!
The leaves look gorgeous when the rising sun shines right onto them.
I did end up cutting off some of the contact paper with an X-acto knife to form a more rounded outline of the leaf sheet because the straight edge was very stark.
~Regina
We went out on a walk and collected a bunch of pretty leaves. Then we ironed the leaves between pieces of wax paper (iron on high, no steam--make sure to cover the wax paper with cloth on both sides!). Once the leaves were nice, flat, and dry, we were ready to use them.
I laid out a nice sheet of clear contact paper, sticky side up, and taped the edges down with painters' tape. We laid the leaves out on it.
Then we took off the painters' tape, stuck the contact paper to the window, smoothed it out and we were done!
Our little girl was so proud of herself!
The leaves look gorgeous when the rising sun shines right onto them.
I did end up cutting off some of the contact paper with an X-acto knife to form a more rounded outline of the leaf sheet because the straight edge was very stark.
Wednesday, October 26, 2011
Nubbie Doll
The baby is 6 weeks old, guess maternity leave is over! ;)
Before our little guy was born, I spent some time looking at the wide variety of loveys available on the market. I loved how the Cuski looked, but not the price tag, so I set out to find something similar. I found the Nubbie Doll at WeeFolkArt.
I had decided I was going to make two of these as stocking stuffers for our kiddos. Then our church started the drive to collect Operation Christmas Child boxes and I realized that one of these would be a perfect little doll/lovey/thing to include in a box! Actually, I have to thank my mother in law for really being the one who gave me this idea since she had mentioned including simple hand-made loveys in boxes in years past. I just hadn't thought about it until I was looking at the tutorial for this little doll.
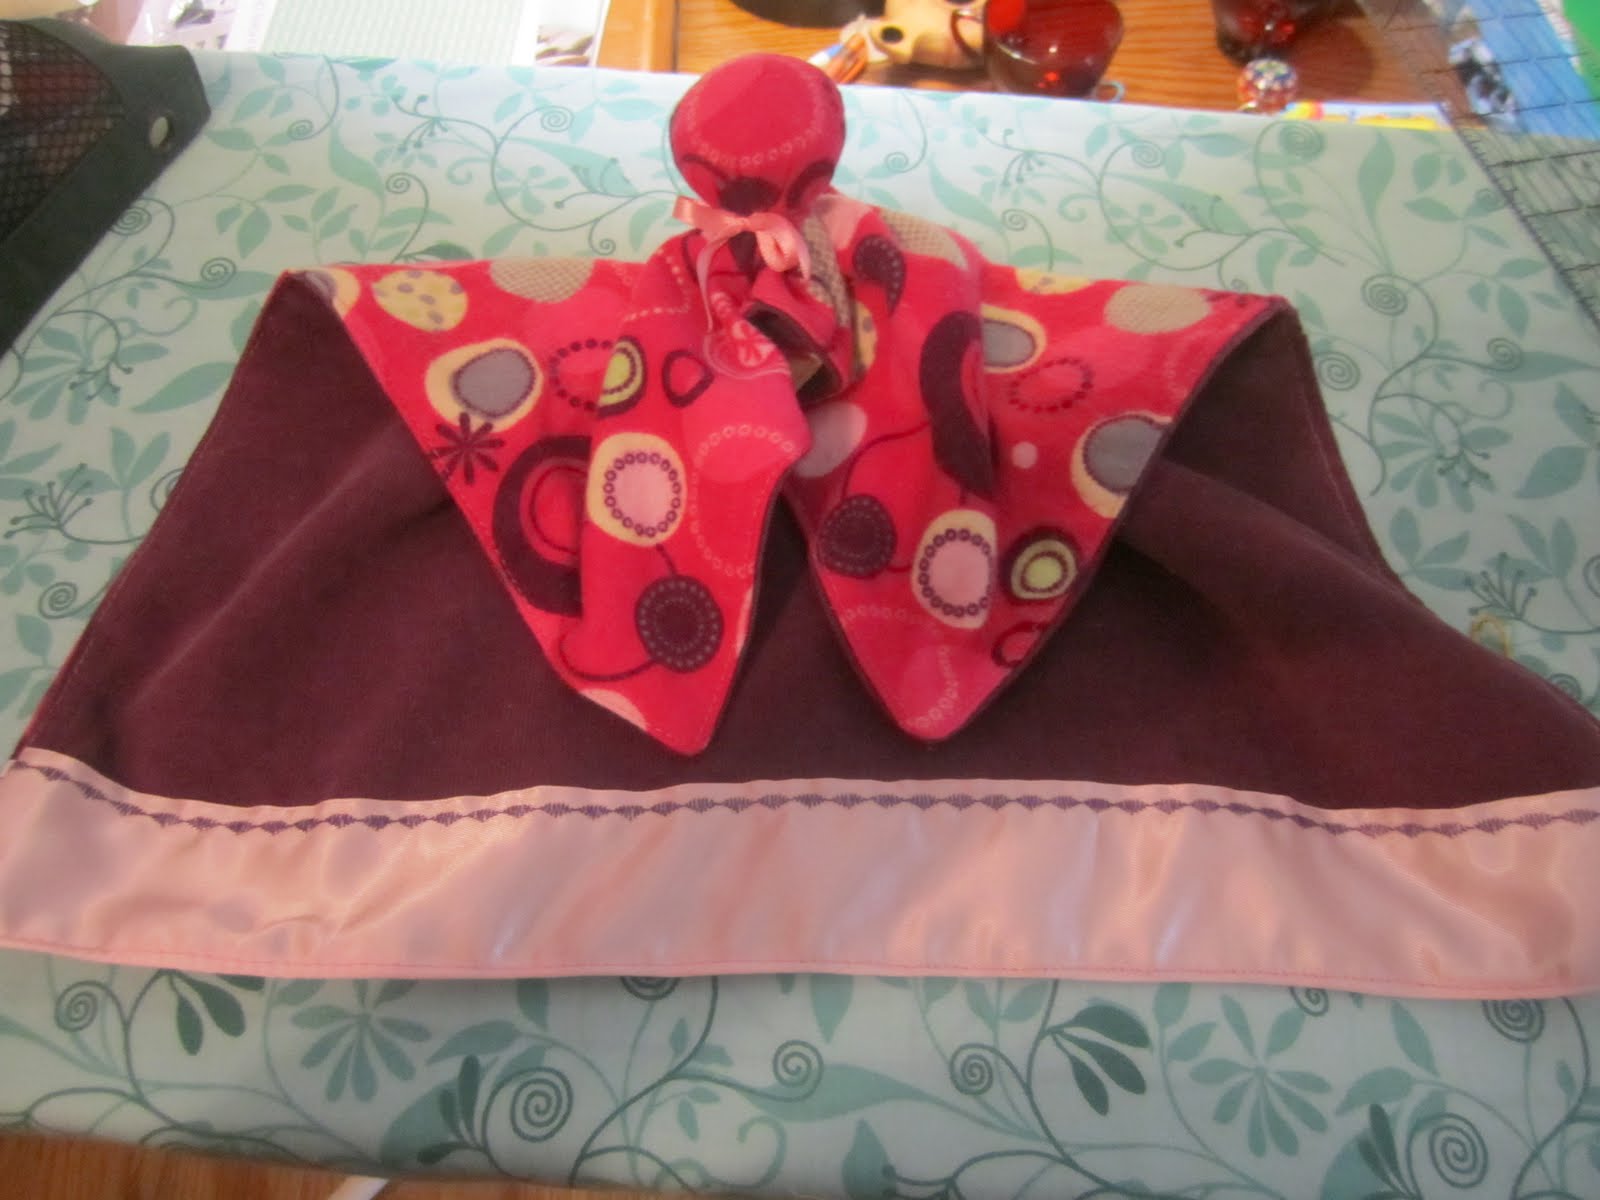
This little doll is super easy to make. I made it more complicated by using two fabrics rather than just one, but it still is super-duper easy. I loved the bright pink flannel and I backed it with the deep purple corduroy. The fabrics are sooo nice and soft. I hope they hold up well for whoever gets this gift!
I had fun with the decorative stitches on my machine. I hadn't had a reason to use them yet (I've had the machine for only about a year), so it was great to have a reason to flip through all of them.
The head itself is pretty easy and not too big. The doll is the perfect size for little hands and will pack nice and compactly in the shoe box! I may experiment with the shape of the doll with the ones I make for my kiddos, but I really like the way this doll turned out. It's perfect for a Christmas shoebox.
I decided just to show my little doll off rather than writing up a full tutorial since the WeeFolkArt one is nice and clear... and I have a fussy baby on my lap.
~Regina
Before our little guy was born, I spent some time looking at the wide variety of loveys available on the market. I loved how the Cuski looked, but not the price tag, so I set out to find something similar. I found the Nubbie Doll at WeeFolkArt.
I had decided I was going to make two of these as stocking stuffers for our kiddos. Then our church started the drive to collect Operation Christmas Child boxes and I realized that one of these would be a perfect little doll/lovey/thing to include in a box! Actually, I have to thank my mother in law for really being the one who gave me this idea since she had mentioned including simple hand-made loveys in boxes in years past. I just hadn't thought about it until I was looking at the tutorial for this little doll.
This little doll is super easy to make. I made it more complicated by using two fabrics rather than just one, but it still is super-duper easy. I loved the bright pink flannel and I backed it with the deep purple corduroy. The fabrics are sooo nice and soft. I hope they hold up well for whoever gets this gift!
I had fun with the decorative stitches on my machine. I hadn't had a reason to use them yet (I've had the machine for only about a year), so it was great to have a reason to flip through all of them.
The head itself is pretty easy and not too big. The doll is the perfect size for little hands and will pack nice and compactly in the shoe box! I may experiment with the shape of the doll with the ones I make for my kiddos, but I really like the way this doll turned out. It's perfect for a Christmas shoebox.
I decided just to show my little doll off rather than writing up a full tutorial since the WeeFolkArt one is nice and clear... and I have a fussy baby on my lap.
~Regina
Labels:
blanket,
christmas,
doll,
easy,
lovey,
nubbie,
operation christmas child,
quick,
stocking,
stuffer,
toy
Thursday, December 9, 2010
How to Shine Copper
So it's that time of the year where we all are cleaning everything--including the super random things like our teapot bottoms! Yes, I cleaned the copper bottom of my teapot not too long ago. This is what it looked like after I had scrubbed it, layered a baking soda paste on it and left that to sit, and scrubbed it some more. Let me tell you, it looked much better than it had. I pretty much gave up hope on the last of the burned-on spots, but I wanted to make the rest of it look pretty.
So I went searching for some ideas on how to help my the copper bottom look even nicer. I have a nifty little book from Reader's Digest that shares all sorts of creative, helpful uses for random stuff you might have around your house, so I checked there. They suggested ketchup--which I have lots of! Who with a toddler doesn't have lots of ketchup? So I followed their instructions and glopped on a nice thick layer of ketchup and left the tea pot to sit for 30 minutes.
After 30 minutes, I eagerly wiped off the ketchup to see if it had worked. And look at that: the copper looks wonderful! Too bad I couldn't get more of the black off, but at least the copper that is clean looks gorgeous!
You can even read the manufacturer's imprint--so the ketchup did help the stubborn black spots, too. I was very pleased with this little trick.
I shined up the rest of my teapot and it looks gorgeous! Now if only I can protect it from splatters from Christmas cooking....
~Regina
So I went searching for some ideas on how to help my the copper bottom look even nicer. I have a nifty little book from Reader's Digest that shares all sorts of creative, helpful uses for random stuff you might have around your house, so I checked there. They suggested ketchup--which I have lots of! Who with a toddler doesn't have lots of ketchup? So I followed their instructions and glopped on a nice thick layer of ketchup and left the tea pot to sit for 30 minutes.
After 30 minutes, I eagerly wiped off the ketchup to see if it had worked. And look at that: the copper looks wonderful! Too bad I couldn't get more of the black off, but at least the copper that is clean looks gorgeous!
You can even read the manufacturer's imprint--so the ketchup did help the stubborn black spots, too. I was very pleased with this little trick.
I shined up the rest of my teapot and it looks gorgeous! Now if only I can protect it from splatters from Christmas cooking....
~Regina
Monday, November 8, 2010
Basic Dough Variation: Bread!
So now that we've worked with the recipe I started with (Pizza dough), we can move on to my favorite activity: experimenting with it! Well, OK, I'm going to go over the basic bread dough recipe that I've found to be trusty and easy. It's fairly close to the pizza dough recipe, but a little sweeter and, of course, shaped and baked slightly differently. Shall we begin?
Basic Bread Dough
1 tablespoon dry active yeast
1/4 cup white sugar
1 cup warm water
3 tablespoons oil
2 1/2 cups flour (or my preference: equal amounts of regular and whole wheat flour)
1 teaspoon salt
Prep time: 1 hr, 15 min-3 hrs (depending upon how long you let it rise and how many rises you do)
Oven: 400 degrees F
Bake time: 20 minutes
Yield: one 1 pound loaf
First, a short caveat about yeast. This is a repeat of what I said in my original pizza recipe post, but it bears repeating here:
1. The water-- Most recipes will tell you to use lukewarm water. I've found that the water is fine as long as it feels warm or even hot but I can keep my finger in the water comfortably. When I was first learning how to make this dough, I used a candy thermometer and tried to get the water between 110-115 degrees F.
2. Proofing--This is when you dissolve the yeast in your warm water and wait 5-10 minutes to let it grow. This was done to make sure the yeast was alive, which is usually not a problem these days (assuming you've stored your yeast properly). So as long as you are confident that you aren't going to kill the yeast with too-hot water, you can skip this step. It saves you about 10 minutes, which is fairly significant.
3. Yeast & salt-- These two should not be brought into direct contact. Salt can kill the yeast if it is sprinkled onto it, so I always put my salt in last, on top of the flour.
Back to the recipe!
Throw everything into your mixing bowl in the order listed: yeast, sugar, water, oil, flour, salt. You can wait for the yeast to proof before you throw in the oil, flour, and salt if you so desire, but I don't.
I like to sprinkle the salt over the flour to help spread it out--don't want any strong pockets of salt.
Attach your dough hook and let your mixer do the work--let it run 1-2 minutes beyond when the dough has mixed nicely to knead the dough. If you don't have a mixer that can handle the dough, this recipe makes a soft dough, so it's very easy to mix by hand and knead a few minutes until a smooth dough forms.
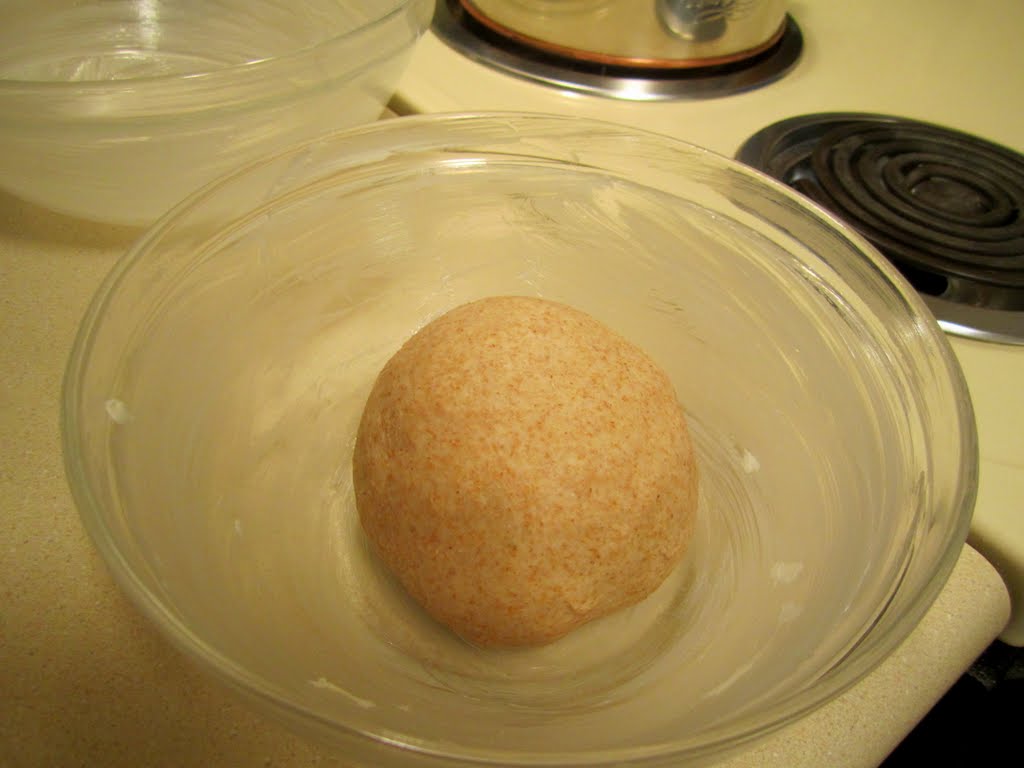
Form into a smooth ball and place in a greased bowl. You can turn it once to grease the dough ball or rub a little of the grease on the top yourself, whatever suits your fancy. :)
Let it rise until it reaches the oh-so-magical double size. How fast it rises depends upon how warm your water was and how warm of a place you put the dough to rise. I like to make everything as warm as possible and typically the dough only needs to rise around 30 minutes, give or take 10 minutes. I usually set my oven to around 150 degrees F and let the dough rise in there. Note: the longer you let it rise, the fluffier the bread will be. I've found the first rise to be key for a nice, soft loaf.
Sometimes I let it rise a second time, if I'm not in a hurry, otherwise I shape it into whatever I'm making it. In the case of these pictures, I was making a HALF-loaf, semi-free form. I like to flour the top and then slash it. (Note: If you are making a FULL bread loaf, then shape it into a kind of oblong shape and drop it into your greased bread pan. Let it rise until it's a little above the top edge of the pan. Bake as normal.)
I let it sit to rise again for another few minutes. After 10-15 minutes, it should look like the below picture. Of course, with a cooler place for it to rise, it will take longer.
Heat your oven to 400 degrees F and bake your HALF loaf for 8-10 minutes. If you are doing a FULL loaf, then you will want to bake it for 20-25 minutes. It should be a nice deep brown, but not burned, and sound hollow when tapped.
I make half loaves pretty often for dinner--it's the perfect size for a single dinner for a small family. A full loaf makes a typical size 1 pound loaf.
Nothing is quite as wonderful as fresh, warm, crusty bread at dinner time! :)
Enjoy!
~Regina
Feel free to post a comment if you have any questions. The comments are moderated, so I should see any questions, no matter how long it has been since this post was published.
Basic Bread Dough
1 tablespoon dry active yeast
1/4 cup white sugar
1 cup warm water
3 tablespoons oil
2 1/2 cups flour (or my preference: equal amounts of regular and whole wheat flour)
1 teaspoon salt
Prep time: 1 hr, 15 min-3 hrs (depending upon how long you let it rise and how many rises you do)
Oven: 400 degrees F
Bake time: 20 minutes
Yield: one 1 pound loaf
First, a short caveat about yeast. This is a repeat of what I said in my original pizza recipe post, but it bears repeating here:
1. The water-- Most recipes will tell you to use lukewarm water. I've found that the water is fine as long as it feels warm or even hot but I can keep my finger in the water comfortably. When I was first learning how to make this dough, I used a candy thermometer and tried to get the water between 110-115 degrees F.
2. Proofing--This is when you dissolve the yeast in your warm water and wait 5-10 minutes to let it grow. This was done to make sure the yeast was alive, which is usually not a problem these days (assuming you've stored your yeast properly). So as long as you are confident that you aren't going to kill the yeast with too-hot water, you can skip this step. It saves you about 10 minutes, which is fairly significant.
3. Yeast & salt-- These two should not be brought into direct contact. Salt can kill the yeast if it is sprinkled onto it, so I always put my salt in last, on top of the flour.
Back to the recipe!
Throw everything into your mixing bowl in the order listed: yeast, sugar, water, oil, flour, salt. You can wait for the yeast to proof before you throw in the oil, flour, and salt if you so desire, but I don't.
I like to sprinkle the salt over the flour to help spread it out--don't want any strong pockets of salt.
Attach your dough hook and let your mixer do the work--let it run 1-2 minutes beyond when the dough has mixed nicely to knead the dough. If you don't have a mixer that can handle the dough, this recipe makes a soft dough, so it's very easy to mix by hand and knead a few minutes until a smooth dough forms.
Form into a smooth ball and place in a greased bowl. You can turn it once to grease the dough ball or rub a little of the grease on the top yourself, whatever suits your fancy. :)
Let it rise until it reaches the oh-so-magical double size. How fast it rises depends upon how warm your water was and how warm of a place you put the dough to rise. I like to make everything as warm as possible and typically the dough only needs to rise around 30 minutes, give or take 10 minutes. I usually set my oven to around 150 degrees F and let the dough rise in there. Note: the longer you let it rise, the fluffier the bread will be. I've found the first rise to be key for a nice, soft loaf.
Sometimes I let it rise a second time, if I'm not in a hurry, otherwise I shape it into whatever I'm making it. In the case of these pictures, I was making a HALF-loaf, semi-free form. I like to flour the top and then slash it. (Note: If you are making a FULL bread loaf, then shape it into a kind of oblong shape and drop it into your greased bread pan. Let it rise until it's a little above the top edge of the pan. Bake as normal.)
I let it sit to rise again for another few minutes. After 10-15 minutes, it should look like the below picture. Of course, with a cooler place for it to rise, it will take longer.
Heat your oven to 400 degrees F and bake your HALF loaf for 8-10 minutes. If you are doing a FULL loaf, then you will want to bake it for 20-25 minutes. It should be a nice deep brown, but not burned, and sound hollow when tapped.
I make half loaves pretty often for dinner--it's the perfect size for a single dinner for a small family. A full loaf makes a typical size 1 pound loaf.
Nothing is quite as wonderful as fresh, warm, crusty bread at dinner time! :)
Enjoy!
~Regina
Feel free to post a comment if you have any questions. The comments are moderated, so I should see any questions, no matter how long it has been since this post was published.
Subscribe to:
Posts (Atom)