Showing posts with label cloth. Show all posts

Friday, March 16, 2012

Simple Spit-Up Cloths

...And, well, I'll show off some pretty spit-up cloths, too. :)
I'm sorry for posting late, we've been taken out by seasonal allergies. I've hardly done any sewing this week.

I finally finished my friend's spit-up cloths for her baby girl. I had tons of fun picking out fabrics and playing with the gorgeous colors. This sweet baby girl is going to have not only great, practical spit-up cloths, but also soft terry-backed cloths with ruffles and ribbon tabs. She also got the chenille cloths I made a while ago.

These more practical spit-up cloths are made from a panel of flannel sewn onto a cloth diaper. How big you make the flannel is up personal preference, but I like to cut my flannel to 19 inches long by 7 inches wide. This is just big enough to cover the center, extra-layered part of the cloth diaper after all the raw edges have been turned under.
 Iron the long sides under and attach a ribbon along the edge. I like to use satin 3/8inch ribbon, but wider ribbon could be fun and grosgrain works well, too.
 Then attach the whole thing to the cloth diaper. Easy as pie! Make sure your bobbin thread matches the cloth diaper's color. If your tension is balanced, then neither should show up on the other side.
 Pink on top!
 White on the bottom!
 All done! So easy and cute!
 Here's my stack!
 The other set has ruffles and ribbon tabs--perfect for little hands to enjoy.
 So fun!

Which one is your favorite?

~Regina

Wednesday, March 7, 2012

Homemade Chenille Spit-Up Cloths

Well, I made it into the next round of Every Creative Endevour's Creative Bloggers Got Talent contest! And the project that got me into the next round was these beautiful homemade chenille spit-up cloths.

A dear friend of mine is having a baby girl in May. She asked me to make some spit-up cloths and I took it upon myself to make her some of the most beautiful, soft spit-up cloths I could. :)

Before our baby boy was born, I learned about homemade chenille. I decided to experiment with it a bit on a small scale, so I sewed some small pieces up and attached it to some cloth diapers to make spit-up cloths. It turned out that these spit-up cloths are the best spit-up catchers in our house. Besides looking really interesting, they also have a great texture that our baby loves to feel. So, of course, I had to make some for my friend, but I didn't want them to just be boring straight lines. Nope, I decided to be crazy and do spirals and ripples. The ripples were pretty easy, but the spirals were definitely more ambitious. Ready see how I made them?

I like to use flannel for my chenille, but any looser-woven cloth will do well. Choose colors that blend well together and match the other side of what will become your spit-up cloth. I chose to use only 3 layers of flannel since I was going to make the chenille ridges pretty short. Cut the fabrics and a base layer to sew them onto to size. These cloths were cut to be 17x17 inches. Choose your color order and it's time to really begin! I have found that having the lightest color on top gives the design the most definition, as you will see in the following pictures.
I decided that I would be stitching with the base layer up so that I could see my stitches, so I laid all the fabrics on top of each other in opposite order. Then secure them. If you have some of that sticky fabric spray, then that would work best. If not, use lots and lots of pins. You can use quilt-basting safety pins, but I prefer to use straight pins so that I can remove them easily. I also marked the quadrants of the cloth on the back to help me arrange my designs.
 To make the spirals, I marked my center and then marked dots like so at 1/4 and 1/2 inches from the center. I recommend doing slightly wider channels than 1/4 inches--the channels were close to too small for cutting on curves. Straight channels would be a different story.
 Then I connected the dots to give me my first several spirals.
 Once you have your spiral going, you can just approximate your way around or use your presser foot at a guide.
 I sewed this spiral until I ran off the edge.
 I filled in the corner and expanded the spiral a bit before moving onto the second spiral.
 Two spirals!
 I filled in the rest of the spit-up cloth with little Vs following the curves of the two spirals.
 All done with the sewing!
 I love my Olfa chenille cutter, it makes cutting the channels so much easier! But you still have to be careful that you don't cut too close to the lines of stitching. I also had some channels that were too narrow for my cutter to get through, so I used my seam ripper.
 Unfortunately, I had a few accidents in the cutting. To fix the gaps, I whip stitched the raw edges together...
 Ironed a patch on using sewable fusible web...
 And then stitched on each edge and the middle, following the stitching above, to secure the patch. Good as new!
 Add the backing and binding before washing! Here's the front, ready to wash...
 And the back! I love these colors.
 Now the ripples....I decided to just do kind of organic, free form ripples. I had tried something more exact, but that didn't work out and I ended up having to tear out 6 lines of stitching, which was super annoying. I made this ripple cloth as a back-up in case the spiral one failed.
 I sewed one initial line and then just kind of followed it the rest of the time. Sometimes I had to stray from the original line to make more ripples because it started smoothing out over time. I enjoyed how it felt kind of spontaneous. :)
 This is the spiral one, freshly washed. If you click on the picture, it should get bigger. You will see that it's a bit shaggy. Those shaggy parts are where I failed to keep the spiral curved enough to stay on the bias. I ended up having to give it a hair cut. Then I washed it again and it got a little bit shaggy again, so it got a second hair cut. I'm pretty sure that it won't be too shaggy with subsequent washings...I hope. The ripple cloth had some very minor shagginess, but nothing that was a big deal.
 Our little guy LOVED looking at the spirals--I may have to make one of these for him.
 Sweet little hands.
 Ripples! I like how the colors on this one turned out better. I just inverted the colors. The spiral cloth's colors are: light pink, dark pink, then orange; the ripple's colors are: orange, dark pink, then light pink.
 And, finally, a fully shot because it drives me crazy when blog posts don't include a picture of the full project. :)

And there you go! Feel free to ask any questions!

~Regina

Wednesday, January 18, 2012

Fancy Spit-Up Cloth

I've seen some lovely "travel sized" loveys and fancy blankets for sale here and there. I keep seeing them and thinking, "I could make that!." I hadn't gone to the trouble of trying to make one until I noticed that my super spitter-upper is beginning to cuddle with his spit-up cloths. Then inspiration struck: why not make a fancy, cuddly spit-up cloth?
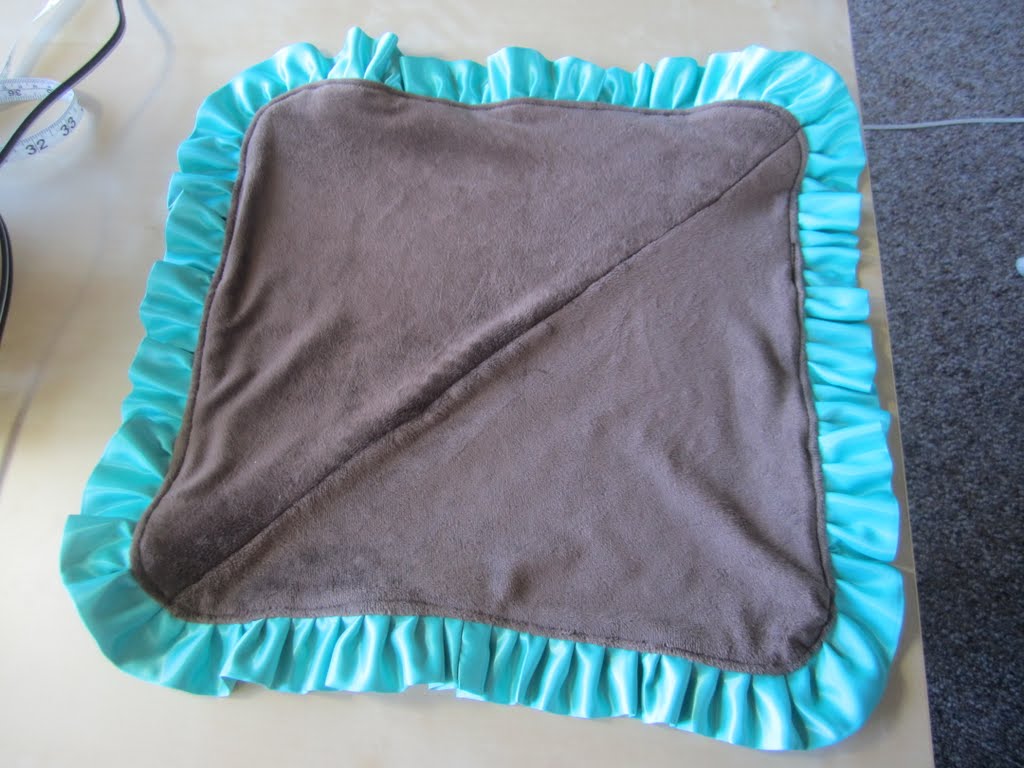
Since this was my first try, I just grabbed scraps from other projects. I pieced the soft microfleece back, used the leftover satin binding from making the baby's nubbie doll, and used the terry cloth liner from a cloth diaper that never got used (I got it for free as a sample). I trimmed everything down to the right size, added an appliqué to the terry cloth side of the cloth, and then set out to try out my new ruffler foot. Whee!
This thing is a beast. But actually, it just snapped onto my foot, so it wasn't as hard to get on as I thought it would be.
After reading the instructions through several times and fiddling with the settings, I got my ruffles to look about right. The ruffler didn't work perfectly (my needle kept getting knocked loose!), but it certainly worked better than the standard way of making ruffles.
I had to undo several ruffles to join the raw ends, but it was easy to re-fold the ruffles.
Pin, pin, pin, pin! Make sure to pin the ruffle pointing in so that when you turn the whole thing right side out, it points out.
Pin the other side to it, right sides together. Sew it all together, leaving a gap of 3-5 inches for turning.
Once it's all together, pull out the pins, and turn it all right side out.
Pin the hole, making sure all the layers are in line, and top stitch.
All done!
Yes, it look a bit girly, but a heart and a few ruffles never hurt a little boy... ;)
He actually loves it, though you couldn't tell it from this photo. ;)

~Regina

Monday, December 13, 2010

Cloth Training Pants!

Just to warn you, this is one looooong tutorial.  I thought about breaking it up into two but it wasn't quite that long...

My almost two-year-old daughter decided that she no longer liked diapers and started refusing to wear them.  So we decided to gently introduce her to the idea of potty training.  To aid with that, I decided that she needed some training pants so that she could work on the concept of keeping her "panties" dry.  After much googling, I finally found this free pattern that I really liked.  It comes from the Nappy Network--DIY side of the site.  Here is the specific Wee Weka Knickers pattern in PDF format.  You can also get to the pattern by clicking on the Nappy Network link, scrolling down to the bottom of their page and finding their link that says "Wee Weka Pull-on training Knickers."

So, go print off the pattern, measure your kiddo to see how he or she compares to the pattern and modify the pattern accordingly.  For my daughter, I made four modifications:
1. I folded over the waist to make the elastic casing rather than sewing on a separate band--my daughter preferred a lower waist.
2. I cut the leg holes a little wider--she liked them to be looser.
3. I did not add cuffs around the leg holes--same reason as the above.
4. I added a small absorbent liner in the crotch area--my preference.

It took making 3 different panties to discover what my daughter liked. I highly recommend making one and modifying the pattern, making another one, modifying it, etc. until you find the right fit for your kiddo.  Here is my final pattern.  You can click on any of these pictures to see them larger.
I used fleece for the panties, but you can use any cloth that has a slight stretch.  Lay the dotted side of the pattern on the fold of your fabric and cut it out.  Make sure that your fabric's stretch runs across the pattern.  I tried to stretch (haha!) the fabric I got by cutting a few panties out with the stretch running the other way and my daughter refuses to wear those.  They just don't fit the same and seem to be too snug.  So don't be like me.
As you can see from the cutting board's measurements, each panty takes about a 15" by 11" piece of fabric.  It will take more if you are doing a separate waist band and leg cuffs.  To figure out the shape and size of the liner, I laid out my cut panty on a blank sheet of paper and traced the leg holes.  Then I rounded out the shape and cut it down a little so that it fit nicely inside the crotch area.
This is what I came up with: a little pad-shaped thing that is about 4" by 7".
I cut out a whole bunch of these from two old sweatshirts of my husband. I used two of these liners per diaper, but I could easily have done three for more absorbency.  I also made them fairly small, you could easily make them larger.
The liners are the first thing to get sewn in. Pin them...
And stitch them in!  I used my longest stitch and went around them twice.
I don't know if it really helps them be more secure or anything like that, but I really like how it looks from the outside of the panties.
Then I pinned up the sides and stitched them at 3/8ths inch seam allowance (rather than the 1/2 inch called for in the pattern). I wanted them to be a little looser than the original pattern's.
Also note that I used a straight stitch. Since I'm using fleece, it won't unravel, so I didn't need to zig-zag the edges.  If you are using a fabric that will unravel, make sure to zig-zag or serge the edges. Or you can do what I did with these to make them more pretty: a sort of half felled seam. 

This is a felled seam.  Basically, you stitch up the seam as normal, then cut one seam allowance shorter than the other, fold the longer one around the shorter and turn under the raw edge so that all raw edges are hidden. Then you stitch it all up.

What I did was stitch up my side seams as I just showed you and trimmed the back panel's seam allowance to be significantly shorter. Then I folded the front panel's seam allowance back over it, but I didn't fold the raw edge under.  I stitched it down just like that.  One raw edge is still showing and the other is hidden. I did this because I wanted the side seams to be a little more finished and flat so that they wouldn't bother my daughter's sensitive skin.  She's very sensitive to the way clothing rubs, so this flattened the potentially annoying seam so that she doesn't even notice it.  It also adds a nice finished touch to the panties.  Make sense?  Probably not, it was hard to catch with photos. Feel free to comment with questions!
Once I had the side seams all sewn up, I started on the waist band.  I simply folded the fabric over on itself about 1/2 inch and stitched it. I didn't do the separate waist band because I wanted the panties to be lower-cut.  But after using these for a while, I think that next time I make them, I will either add more height to the pattern when I cut them out or I will add the separate waist band like the original pattern tells us to do. These are cut just a bit too low. Or maybe my daughter grew since I made them, you never know!
I had the front of the waist band dip down a bit more to go under my daughter's little belly. I definitely like how this worked out.  Once they were all pinned, I stitched them up at 3/8ths inch.  Make sure to leave an unstitched hole in the waist band. This is where you'll thread your elastic!
So...your panties are basically all stitched up. This is what we have left to work with: panties, elastic and buttons.
Let's start with the buttons. I had 6 panties that my daughter needed to be able to tell front from back on. So I laid out my many colors of buttons and started choosing which ones to use.
I stitched them on with a zig-zag stitch, trimmed the thread, and dabbed fabric glue onto the threads to protect them from tiny hands that like to pull on threads.  Why did I do so many colors? Because I'm a glutton for punishment and love changing the thread out on my machine...just kidding. I just wanted lots of colors--nevermind that it was rather annoying to switch the colors out for the various buttons...
Then cut out your elastic.  I cut these at 14 inches for my daughter's 20-21 inch waist--they're a bit tight, so next time I'll cut them a bit looser.
Thread them through the waist band using a safety pin...
And stitch them!  I used a zig-zag stitch and went back and forth over them several times. I took the needle you see there out before I really started stitching. It was there to keep the overlap in place until I could get it under my presser foot.
My lovely elastic stitching job....
Stitch up the hole in the waist band and you're done!
I keep mine stacked in a convenient spot in our living room--right next to the cloth diapers/spit-up cloths that are used to clean up accidents.
And here's my little one (well, part of her) modeling her panties.  So cute!

There you go: how I modified a pattern to make my own cloth training pants.  Our potty training kind of isn't going anywhere, but hopefully yours will move along much better than ours!  My little girl seems to think her panties are cloth diapers and prefers them over our typical disposables.  I comfort myself with the fact that we're saving money on the disposables.... ;)

Feel free to leave a comment if you have any questions! The comments are moderated so I will see the questions no matter how long ago I posted this.

~Regina