Showing posts with label ribbon. Show all posts

Friday, March 16, 2012

Simple Spit-Up Cloths

...And, well, I'll show off some pretty spit-up cloths, too. :)
I'm sorry for posting late, we've been taken out by seasonal allergies. I've hardly done any sewing this week.

I finally finished my friend's spit-up cloths for her baby girl. I had tons of fun picking out fabrics and playing with the gorgeous colors. This sweet baby girl is going to have not only great, practical spit-up cloths, but also soft terry-backed cloths with ruffles and ribbon tabs. She also got the chenille cloths I made a while ago.

These more practical spit-up cloths are made from a panel of flannel sewn onto a cloth diaper. How big you make the flannel is up personal preference, but I like to cut my flannel to 19 inches long by 7 inches wide. This is just big enough to cover the center, extra-layered part of the cloth diaper after all the raw edges have been turned under.
 Iron the long sides under and attach a ribbon along the edge. I like to use satin 3/8inch ribbon, but wider ribbon could be fun and grosgrain works well, too.
 Then attach the whole thing to the cloth diaper. Easy as pie! Make sure your bobbin thread matches the cloth diaper's color. If your tension is balanced, then neither should show up on the other side.
 Pink on top!
 White on the bottom!
 All done! So easy and cute!
 Here's my stack!
 The other set has ruffles and ribbon tabs--perfect for little hands to enjoy.
 So fun!

Which one is your favorite?

~Regina

Thursday, February 2, 2012

Woven Ribbon Heart Pillow

Our daughter's birthday was coming up when I stumbled across this cute idea for a woven ribbon pillow. But the plain square pillow didn't have enough pizazz, so I decided to try something different. I love it! And so does our 3 year old. I told her that whenever she sees it, she can remember that it means that Mommy loves her. She likes to throw herself on her bed and hug it, then she brings it to me and says, "It means Mommy loves you!" So sweet. :)
Rosmademe did a nice tutorial, but I thought I would walk through the process here, too. I gathered all my supplies, including paper, tape, and scissors to make my heart shape.
I taped up the paper, folded it in half, and cut out a heart shape. My heart ended up being 16 inches long by 15 inches wide.
I traced the heart onto some muslin.
Then I ironed sewable fusible bonding stuff (HeatnBond sewable/lite bonding web) onto the other side of the muslin. I wanted my traced heart to be on the back side of everything so that I could see it after I had woven all of my ribbons. Pull off the paper backing so that the sticky-ish side of the webbing is exposed.
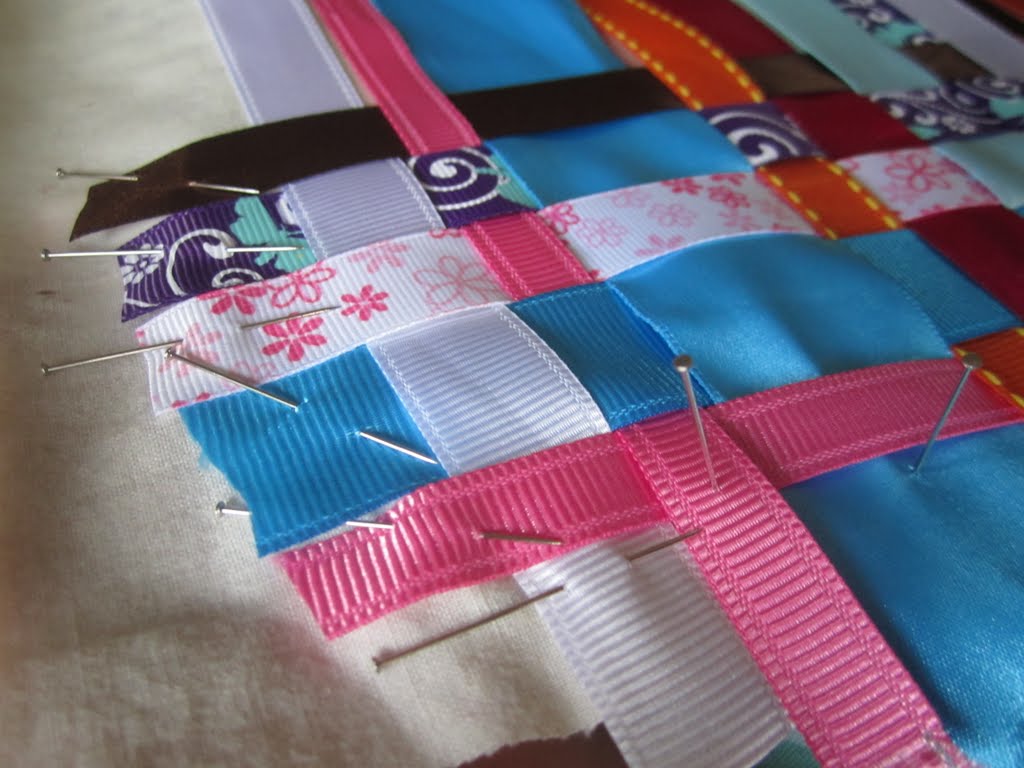
Line up all your ribbons and pin them down on both ends. I wanted to do mainly warm colors (orange, pink, red, brown, etc.) but included some blues, too. I changed my mind later and actually pulled most of the blue ribbons out of the finished weaving and re-weaved some different ribbons to keep the theme warmer.
Start weaving! I did just a basic weaving pattern: over, under, over, under, etc.
You can see better here how I pinned the ribbons down.
I finally finished weaving! This took me about 1.5-2 hours to finish--an entire naptime. You can see that I replaced the vivid blues with pinks, but left a few lighter blues.
Cover all the ribbon with an ironing cloth and iron away! Ironing was hard work. I found that I had to warm my iron up to medium high (rather than the medium that HeatnBond calls for) since there were so many layers to work with.
Not all of my ribbons bonded easily, so I did have to leave a few pins in here and there while I stitched. I sewed a line all the way around my heart outline, about a 1/4 inch to the outside of it. This line of stitching was just to hold it all in place.
Front side of the stitching.
Then I trimmed it up. Yay, it looks so pretty!
I took some pre-made satin binding and ironed it flat. I used that for the sides of my pillow. I was going to just sew the back of the pillow right to the front, but then I thought that adding a side (wall?) might make it a bit more fluffy. I also added an extra strip of muslin the same width as the satin to reinforce the satin. It seemed like a good idea, but it might have been overkill.
I sewed it all around the front (right sides together!). Then I sewed the back of the pillow on (right sides together again), leaving a gap of about 5 inches for turning. Before turning, I clipped and notched all the corners of the heart and ironed the seams over toward the front of the pillow. I tried turning it right side out without ironing the seam, but they were so stiff that they were deforming the pillow, so they needed a good ironing.
Turning it right side out!
Flat pillow from the back.
Flat pillow from the front. Almost done!
Stuff pretty stiffly since stuffing seems to squish over time and sew the gap closed with an invisible ladder stitch. All done!

All together, I think this project took me about 7 hours. So there's enough time between now and Valentine's Day for you to make one! ;)

If you shop at Hobby Lobby, they have these ribbon remnant bags in the ribbon-sold-by-the-yard section. Each bag has a bunch of ribbons that are each about 2 yards long. One of those bags is plenty for this project.

Happy sewing!
~Regina

Thursday, December 16, 2010

Fun Christmas Stuff Around our House

First off, we have our Christmas tree.  Now, with a very curious, active toddler, I was stumped as to what to do about ornaments.  Sure, they make those "unbreakable" ones, but neither my husband nor myself were sure that they would stand up to our daughter.  One day, we wandered around the discount store, looking for ideas when my daughter picked up a package of golden jingle bells and gave them a shake.  As I turned towards her to make sure she wasn't about to break anything, my eye caught another package of red jingle bells. And thus, our Christmas tree ornaments were found....

After bedtime and clean up, our tree looks like this:
During the day, it looks more like this, and this is on a good day:
The poor little bells spend more time on the floor than they do on the tree, but at least my daughter has fun running around shaking them!

Second, we have three ice wreaths that I had fun creating from various left-over craft supplies that we had laying (lying? I can't ever get those straight.) around.  The original idea is over here and she made some gorgeous wreathes!
Mine were mostly colored string and ribbon. Nothing special, but still fun.
This morning I noticed that the wreaths were "growing" icicles! How fun!
Third, we have our over-the-door swag thingie. ;)  It's just lights, ribbon, and glass ornaments. I'm rather pleased with how it turned out.
It was difficult to get a full picture of (daylight coming through the doors), so you'll just have to fill in the gaps...
Finally, since my daughter loves bells so much right now, I found some larger bells on sale at joann's and made a bell door knob hanger.  To do it, I learned how to loop braid ribbon and how to make korker spiral ribbon.  For loop braiding, you can do it with one color or two colors.  For the korker spirals, I found this blog and this blog most helpful.  Everyone had slightly different ideas about how to do them, but the idea is all the same, so I just mish-mashed it together and mine turned out great!
Well, my daughter is knocking on her bedroom door to be let up from "naptime."  Coming soon: how to make cinnamon rolls with my basic bread dough recipe! Mmmmm!

~Regina