Our 3 year old had a distinct lack of summer clothing in this unseasonably warm weather. We picked up some t-shirts from the thrift store--some cute, but some very plain. I immediately made plans to spruce them up, then got the idea to include our daughter, hoping she was old enough to handle it. She was, in fact, absolutely wonderful.
She even had her own idea about how to decorate one of them.
She had her heart set on the flowers and fairy from Harold's Fairy Tale.
I cut freezer paper to the size of the front of the shirt and traced the pictures straight out of the book using a sharpie. The moon was the finishing touch--also suggested by my daughter.
I cut the shapes out going along the outside of the lines. Then I went back and cut along the inside of the lines. I ironed the main shapes onto the shirt first, then carefully added in the inside shapes so that only the space that used to be lines would be painted.
Then I managed to spill a bunch of water on it and I had to take some time to cry it out. The blowdrier worked pretty quickly. :)
Finally! Time to paint! I set her up outside with some nice purple paint and let her go to town.
She was so excited.
She decided she was done once she got here, but she came back later and filled up the rest of the white space, just for good measure.
She really layered on the paint, but it barely soaked through the other side. The newspaper in between the layers of the shirt was just in case it soaked through badly.
It turned out wonderfully! Here's the fairy...
And the flowers!
Sooo cute! Our daughter did such a great job. :)
~Regina
Showing posts with label toddler. Show all posts
Wednesday, March 21, 2012
Thursday, February 16, 2012
Colored Ice Blocks
Up for some winter fun? If the weather outside is hanging out below freezing, then this something for you and your kiddos!
This is a seriously simple project, but it's lots of fun. Our 3 year old daughter had fun "helping" me.
I did about 4 cups of each color. I just used regular liquid food coloring and added color until I liked how it looked. Liquid watercolors would probably work really well, also.
We poured the colors into all sorts of containers for freezing. Make sure to use containers that are wider at the top than at the bottom so that the blocks pop out nicely. I made the mistake of using cleaned juice "cans" and couldn't get the blocks out for 2 days! Oops.
An excited little girl.
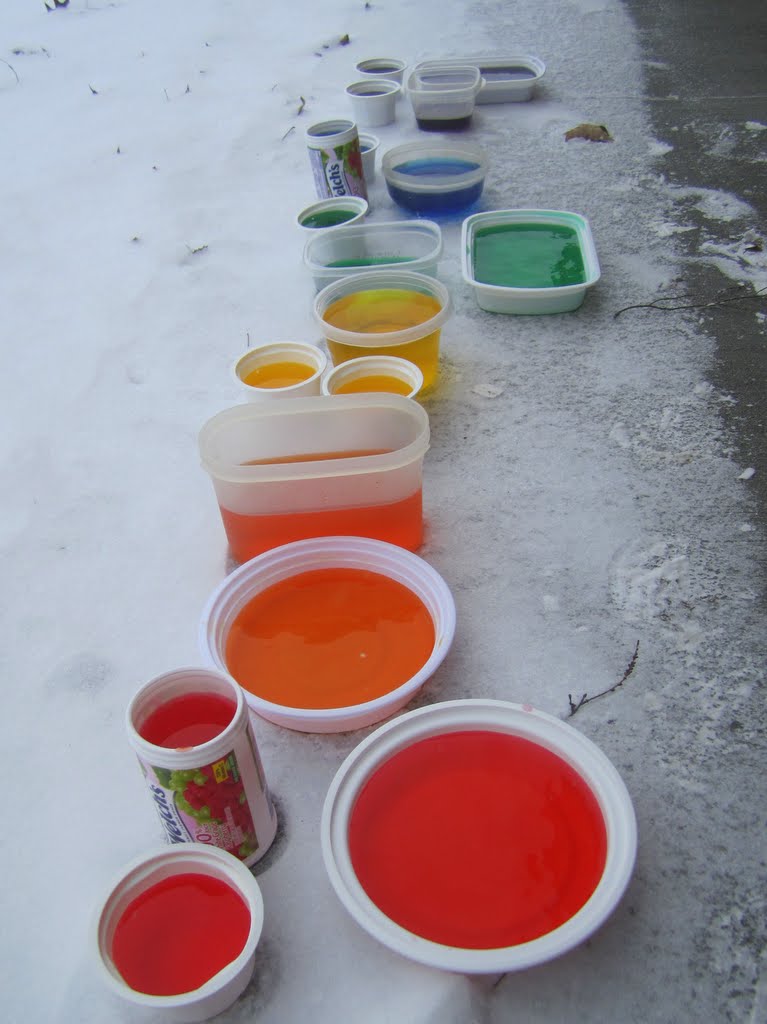
Pretty colors! I did two mini-muffins of each color. I found that the purple turned kind of black as it froze, but the other colors worked out great.
We lined them all up outside and left them for 2 days.
Frozen! See how the purple (in the upper right corner) has turned blackish?
We timed our ice blocks really well. We had two really cold days to get them nice and solid, then the third day was a bit warmer so that the blocks came out a bit more easily.
I even bundled up our little guy to come watch. Sunlight is good for all of us!
Stacking...
Building...
So many possibilities!
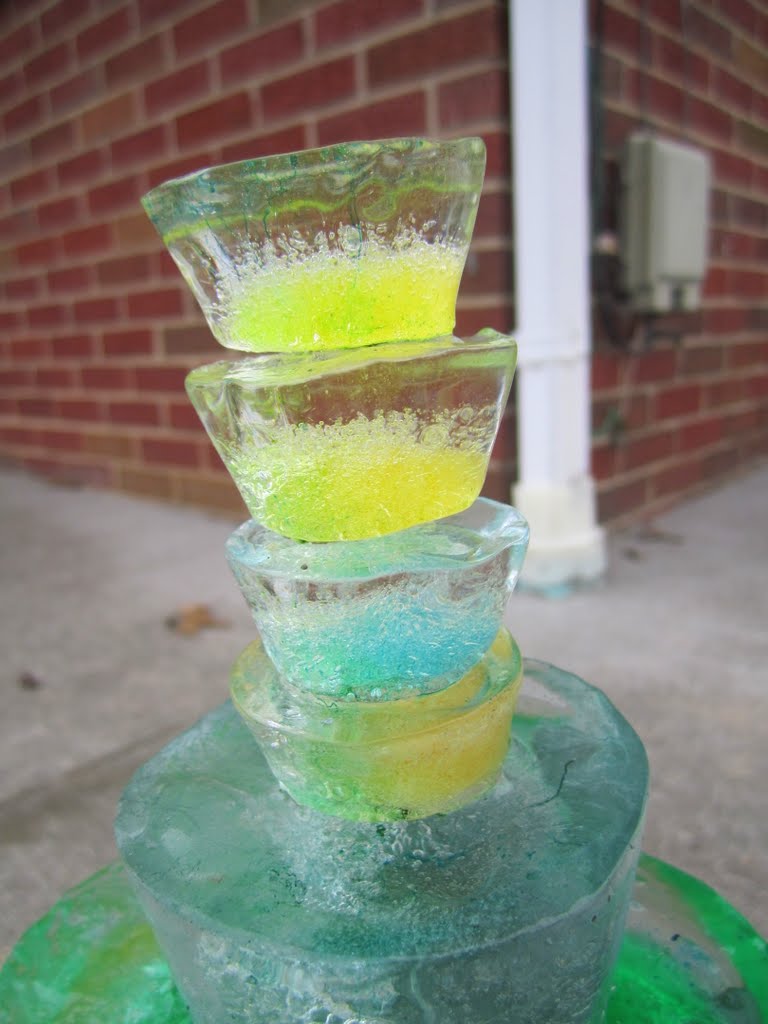
Our daughter insisted that this is a parking garage (what??!) but it looks like an ice castle to me. :)
Twenty-four hours later, this is what our ice castle looked like.
I love how the color ended up concentrated in one area.
The castle stuck around for 2 to 2 and a half days before completely melting away. If your weather stayed colder, then that wouldn't be an issue. Just make sure to build it somewhere where it won't be in the way all winter!
Happy building!
~Regina
This is a seriously simple project, but it's lots of fun. Our 3 year old daughter had fun "helping" me.
I did about 4 cups of each color. I just used regular liquid food coloring and added color until I liked how it looked. Liquid watercolors would probably work really well, also.
We poured the colors into all sorts of containers for freezing. Make sure to use containers that are wider at the top than at the bottom so that the blocks pop out nicely. I made the mistake of using cleaned juice "cans" and couldn't get the blocks out for 2 days! Oops.
An excited little girl.
Pretty colors! I did two mini-muffins of each color. I found that the purple turned kind of black as it froze, but the other colors worked out great.
We lined them all up outside and left them for 2 days.
Frozen! See how the purple (in the upper right corner) has turned blackish?
We timed our ice blocks really well. We had two really cold days to get them nice and solid, then the third day was a bit warmer so that the blocks came out a bit more easily.
I even bundled up our little guy to come watch. Sunlight is good for all of us!
Stacking...
Building...
So many possibilities!
Our daughter insisted that this is a parking garage (what??!) but it looks like an ice castle to me. :)
Twenty-four hours later, this is what our ice castle looked like.
I love how the color ended up concentrated in one area.
The castle stuck around for 2 to 2 and a half days before completely melting away. If your weather stayed colder, then that wouldn't be an issue. Just make sure to build it somewhere where it won't be in the way all winter!
Happy building!
~Regina
Sunday, August 7, 2011
Homemade Paints!
I've been trying out lots of fun activities with our little girl this summer. She loved painting with watercolor so much, that I decided to try more traditional paints.
Recipe here (scroll to the bottom)
Flour Fingerpaint
1 cup flour
2 tablespoons salt
1 1/2 cups cold water
1 1/4 cups hot water
Food coloring or tempera paint
Directions
1. Put flour and salt in saucepan.
2. Add cold water and beat with whisk or eggbeater until smooth.
3. Add hot water and boil until mixture is thick.
4. Beat again until smooth.
5. Color as desired with food coloring or powdered tempera paint.
6. Store covered in refrigerator.
My little girl watched me while I cooked the paint, then she got to help make the colors!
She LOVED mixing the food colorings in.
Finally, it was time to paint!
She had to make sure that each paint brush matched the paint it was in as closely as possible...
Finally, we got around to some painting. I had to show her "how" to paint.
The paint didn't cover the paper quite as nicely as I would have liked. My daughter also wasn't as thrilled with this type of paint as she was with the water colors. I tried thinning out the paint the next time, but it didn't help her want to do it more. So the paints sat in our fridge for 6 weeks until I realized that they had started to grow mold. Yuck. I guess we need to buy non-perishable paint if we want to keep it around...
~Regina
Recipe here (scroll to the bottom)
Flour Fingerpaint
1 cup flour
2 tablespoons salt
1 1/2 cups cold water
1 1/4 cups hot water
Food coloring or tempera paint
Directions
1. Put flour and salt in saucepan.
2. Add cold water and beat with whisk or eggbeater until smooth.
3. Add hot water and boil until mixture is thick.
4. Beat again until smooth.
5. Color as desired with food coloring or powdered tempera paint.
6. Store covered in refrigerator.
My little girl watched me while I cooked the paint, then she got to help make the colors!
She LOVED mixing the food colorings in.
Finally, it was time to paint!
She had to make sure that each paint brush matched the paint it was in as closely as possible...
Finally, we got around to some painting. I had to show her "how" to paint.
The paint didn't cover the paper quite as nicely as I would have liked. My daughter also wasn't as thrilled with this type of paint as she was with the water colors. I tried thinning out the paint the next time, but it didn't help her want to do it more. So the paints sat in our fridge for 6 weeks until I realized that they had started to grow mold. Yuck. I guess we need to buy non-perishable paint if we want to keep it around...
~Regina
Monday, December 13, 2010
Cloth Training Pants!
Just to warn you, this is one looooong tutorial. I thought about breaking it up into two but it wasn't quite that long...
My almost two-year-old daughter decided that she no longer liked diapers and started refusing to wear them. So we decided to gently introduce her to the idea of potty training. To aid with that, I decided that she needed some training pants so that she could work on the concept of keeping her "panties" dry. After much googling, I finally found this free pattern that I really liked. It comes from the Nappy Network--DIY side of the site. Here is the specific Wee Weka Knickers pattern in PDF format. You can also get to the pattern by clicking on the Nappy Network link, scrolling down to the bottom of their page and finding their link that says "Wee Weka Pull-on training Knickers."
So, go print off the pattern, measure your kiddo to see how he or she compares to the pattern and modify the pattern accordingly. For my daughter, I made four modifications:
1. I folded over the waist to make the elastic casing rather than sewing on a separate band--my daughter preferred a lower waist.
2. I cut the leg holes a little wider--she liked them to be looser.
3. I did not add cuffs around the leg holes--same reason as the above.
4. I added a small absorbent liner in the crotch area--my preference.
It took making 3 different panties to discover what my daughter liked. I highly recommend making one and modifying the pattern, making another one, modifying it, etc. until you find the right fit for your kiddo. Here is my final pattern. You can click on any of these pictures to see them larger.
I used fleece for the panties, but you can use any cloth that has a slight stretch. Lay the dotted side of the pattern on the fold of your fabric and cut it out. Make sure that your fabric's stretch runs across the pattern. I tried to stretch (haha!) the fabric I got by cutting a few panties out with the stretch running the other way and my daughter refuses to wear those. They just don't fit the same and seem to be too snug. So don't be like me.
As you can see from the cutting board's measurements, each panty takes about a 15" by 11" piece of fabric. It will take more if you are doing a separate waist band and leg cuffs. To figure out the shape and size of the liner, I laid out my cut panty on a blank sheet of paper and traced the leg holes. Then I rounded out the shape and cut it down a little so that it fit nicely inside the crotch area.
This is what I came up with: a little pad-shaped thing that is about 4" by 7".
I cut out a whole bunch of these from two old sweatshirts of my husband. I used two of these liners per diaper, but I could easily have done three for more absorbency. I also made them fairly small, you could easily make them larger.
The liners are the first thing to get sewn in. Pin them...
And stitch them in! I used my longest stitch and went around them twice.
I don't know if it really helps them be more secure or anything like that, but I really like how it looks from the outside of the panties.
Then I pinned up the sides and stitched them at 3/8ths inch seam allowance (rather than the 1/2 inch called for in the pattern). I wanted them to be a little looser than the original pattern's.
Also note that I used a straight stitch. Since I'm using fleece, it won't unravel, so I didn't need to zig-zag the edges. If you are using a fabric that will unravel, make sure to zig-zag or serge the edges. Or you can do what I did with these to make them more pretty: a sort of half felled seam.
This is a felled seam. Basically, you stitch up the seam as normal, then cut one seam allowance shorter than the other, fold the longer one around the shorter and turn under the raw edge so that all raw edges are hidden. Then you stitch it all up.
What I did was stitch up my side seams as I just showed you and trimmed the back panel's seam allowance to be significantly shorter. Then I folded the front panel's seam allowance back over it, but I didn't fold the raw edge under. I stitched it down just like that. One raw edge is still showing and the other is hidden. I did this because I wanted the side seams to be a little more finished and flat so that they wouldn't bother my daughter's sensitive skin. She's very sensitive to the way clothing rubs, so this flattened the potentially annoying seam so that she doesn't even notice it. It also adds a nice finished touch to the panties. Make sense? Probably not, it was hard to catch with photos. Feel free to comment with questions!
Once I had the side seams all sewn up, I started on the waist band. I simply folded the fabric over on itself about 1/2 inch and stitched it. I didn't do the separate waist band because I wanted the panties to be lower-cut. But after using these for a while, I think that next time I make them, I will either add more height to the pattern when I cut them out or I will add the separate waist band like the original pattern tells us to do. These are cut just a bit too low. Or maybe my daughter grew since I made them, you never know!
I had the front of the waist band dip down a bit more to go under my daughter's little belly. I definitely like how this worked out. Once they were all pinned, I stitched them up at 3/8ths inch. Make sure to leave an unstitched hole in the waist band. This is where you'll thread your elastic!
So...your panties are basically all stitched up. This is what we have left to work with: panties, elastic and buttons.
Let's start with the buttons. I had 6 panties that my daughter needed to be able to tell front from back on. So I laid out my many colors of buttons and started choosing which ones to use.
I stitched them on with a zig-zag stitch, trimmed the thread, and dabbed fabric glue onto the threads to protect them from tiny hands that like to pull on threads. Why did I do so many colors? Because I'm a glutton for punishment and love changing the thread out on my machine...just kidding. I just wanted lots of colors--nevermind that it was rather annoying to switch the colors out for the various buttons...
Then cut out your elastic. I cut these at 14 inches for my daughter's 20-21 inch waist--they're a bit tight, so next time I'll cut them a bit looser.
Thread them through the waist band using a safety pin...
And stitch them! I used a zig-zag stitch and went back and forth over them several times. I took the needle you see there out before I really started stitching. It was there to keep the overlap in place until I could get it under my presser foot.
My lovely elastic stitching job....
Stitch up the hole in the waist band and you're done!
I keep mine stacked in a convenient spot in our living room--right next to the cloth diapers/spit-up cloths that are used to clean up accidents.
And here's my little one (well, part of her) modeling her panties. So cute!
There you go: how I modified a pattern to make my own cloth training pants. Our potty training kind of isn't going anywhere, but hopefully yours will move along much better than ours! My little girl seems to think her panties are cloth diapers and prefers them over our typical disposables. I comfort myself with the fact that we're saving money on the disposables.... ;)
Feel free to leave a comment if you have any questions! The comments are moderated so I will see the questions no matter how long ago I posted this.
~Regina
My almost two-year-old daughter decided that she no longer liked diapers and started refusing to wear them. So we decided to gently introduce her to the idea of potty training. To aid with that, I decided that she needed some training pants so that she could work on the concept of keeping her "panties" dry. After much googling, I finally found this free pattern that I really liked. It comes from the Nappy Network--DIY side of the site. Here is the specific Wee Weka Knickers pattern in PDF format. You can also get to the pattern by clicking on the Nappy Network link, scrolling down to the bottom of their page and finding their link that says "Wee Weka Pull-on training Knickers."
So, go print off the pattern, measure your kiddo to see how he or she compares to the pattern and modify the pattern accordingly. For my daughter, I made four modifications:
1. I folded over the waist to make the elastic casing rather than sewing on a separate band--my daughter preferred a lower waist.
2. I cut the leg holes a little wider--she liked them to be looser.
3. I did not add cuffs around the leg holes--same reason as the above.
4. I added a small absorbent liner in the crotch area--my preference.
It took making 3 different panties to discover what my daughter liked. I highly recommend making one and modifying the pattern, making another one, modifying it, etc. until you find the right fit for your kiddo. Here is my final pattern. You can click on any of these pictures to see them larger.
I used fleece for the panties, but you can use any cloth that has a slight stretch. Lay the dotted side of the pattern on the fold of your fabric and cut it out. Make sure that your fabric's stretch runs across the pattern. I tried to stretch (haha!) the fabric I got by cutting a few panties out with the stretch running the other way and my daughter refuses to wear those. They just don't fit the same and seem to be too snug. So don't be like me.
As you can see from the cutting board's measurements, each panty takes about a 15" by 11" piece of fabric. It will take more if you are doing a separate waist band and leg cuffs. To figure out the shape and size of the liner, I laid out my cut panty on a blank sheet of paper and traced the leg holes. Then I rounded out the shape and cut it down a little so that it fit nicely inside the crotch area.
This is what I came up with: a little pad-shaped thing that is about 4" by 7".
I cut out a whole bunch of these from two old sweatshirts of my husband. I used two of these liners per diaper, but I could easily have done three for more absorbency. I also made them fairly small, you could easily make them larger.
The liners are the first thing to get sewn in. Pin them...
And stitch them in! I used my longest stitch and went around them twice.
I don't know if it really helps them be more secure or anything like that, but I really like how it looks from the outside of the panties.
Then I pinned up the sides and stitched them at 3/8ths inch seam allowance (rather than the 1/2 inch called for in the pattern). I wanted them to be a little looser than the original pattern's.
Also note that I used a straight stitch. Since I'm using fleece, it won't unravel, so I didn't need to zig-zag the edges. If you are using a fabric that will unravel, make sure to zig-zag or serge the edges. Or you can do what I did with these to make them more pretty: a sort of half felled seam.
This is a felled seam. Basically, you stitch up the seam as normal, then cut one seam allowance shorter than the other, fold the longer one around the shorter and turn under the raw edge so that all raw edges are hidden. Then you stitch it all up.
What I did was stitch up my side seams as I just showed you and trimmed the back panel's seam allowance to be significantly shorter. Then I folded the front panel's seam allowance back over it, but I didn't fold the raw edge under. I stitched it down just like that. One raw edge is still showing and the other is hidden. I did this because I wanted the side seams to be a little more finished and flat so that they wouldn't bother my daughter's sensitive skin. She's very sensitive to the way clothing rubs, so this flattened the potentially annoying seam so that she doesn't even notice it. It also adds a nice finished touch to the panties. Make sense? Probably not, it was hard to catch with photos. Feel free to comment with questions!
Once I had the side seams all sewn up, I started on the waist band. I simply folded the fabric over on itself about 1/2 inch and stitched it. I didn't do the separate waist band because I wanted the panties to be lower-cut. But after using these for a while, I think that next time I make them, I will either add more height to the pattern when I cut them out or I will add the separate waist band like the original pattern tells us to do. These are cut just a bit too low. Or maybe my daughter grew since I made them, you never know!
I had the front of the waist band dip down a bit more to go under my daughter's little belly. I definitely like how this worked out. Once they were all pinned, I stitched them up at 3/8ths inch. Make sure to leave an unstitched hole in the waist band. This is where you'll thread your elastic!
So...your panties are basically all stitched up. This is what we have left to work with: panties, elastic and buttons.
Let's start with the buttons. I had 6 panties that my daughter needed to be able to tell front from back on. So I laid out my many colors of buttons and started choosing which ones to use.
I stitched them on with a zig-zag stitch, trimmed the thread, and dabbed fabric glue onto the threads to protect them from tiny hands that like to pull on threads. Why did I do so many colors? Because I'm a glutton for punishment and love changing the thread out on my machine...just kidding. I just wanted lots of colors--nevermind that it was rather annoying to switch the colors out for the various buttons...
Then cut out your elastic. I cut these at 14 inches for my daughter's 20-21 inch waist--they're a bit tight, so next time I'll cut them a bit looser.
Thread them through the waist band using a safety pin...
And stitch them! I used a zig-zag stitch and went back and forth over them several times. I took the needle you see there out before I really started stitching. It was there to keep the overlap in place until I could get it under my presser foot.
My lovely elastic stitching job....
Stitch up the hole in the waist band and you're done!
I keep mine stacked in a convenient spot in our living room--right next to the cloth diapers/spit-up cloths that are used to clean up accidents.
And here's my little one (well, part of her) modeling her panties. So cute!
There you go: how I modified a pattern to make my own cloth training pants. Our potty training kind of isn't going anywhere, but hopefully yours will move along much better than ours! My little girl seems to think her panties are cloth diapers and prefers them over our typical disposables. I comfort myself with the fact that we're saving money on the disposables.... ;)
Feel free to leave a comment if you have any questions! The comments are moderated so I will see the questions no matter how long ago I posted this.
~Regina
Subscribe to:
Posts (Atom)