Our daughter's birthday was coming up when I stumbled across this cute idea for a woven ribbon pillow. But the plain square pillow didn't have enough pizazz, so I decided to try something different. I love it! And so does our 3 year old. I told her that whenever she sees it, she can remember that it means that Mommy loves her. She likes to throw herself on her bed and hug it, then she brings it to me and says, "It means Mommy loves you!" So sweet. :)
Rosmademe did a nice tutorial, but I thought I would walk through the process here, too. I gathered all my supplies, including paper, tape, and scissors to make my heart shape.
I taped up the paper, folded it in half, and cut out a heart shape. My heart ended up being 16 inches long by 15 inches wide.
I traced the heart onto some muslin.
Then I ironed sewable fusible bonding stuff (HeatnBond sewable/lite bonding web) onto the other side of the muslin. I wanted my traced heart to be on the back side of everything so that I could see it after I had woven all of my ribbons. Pull off the paper backing so that the sticky-ish side of the webbing is exposed.
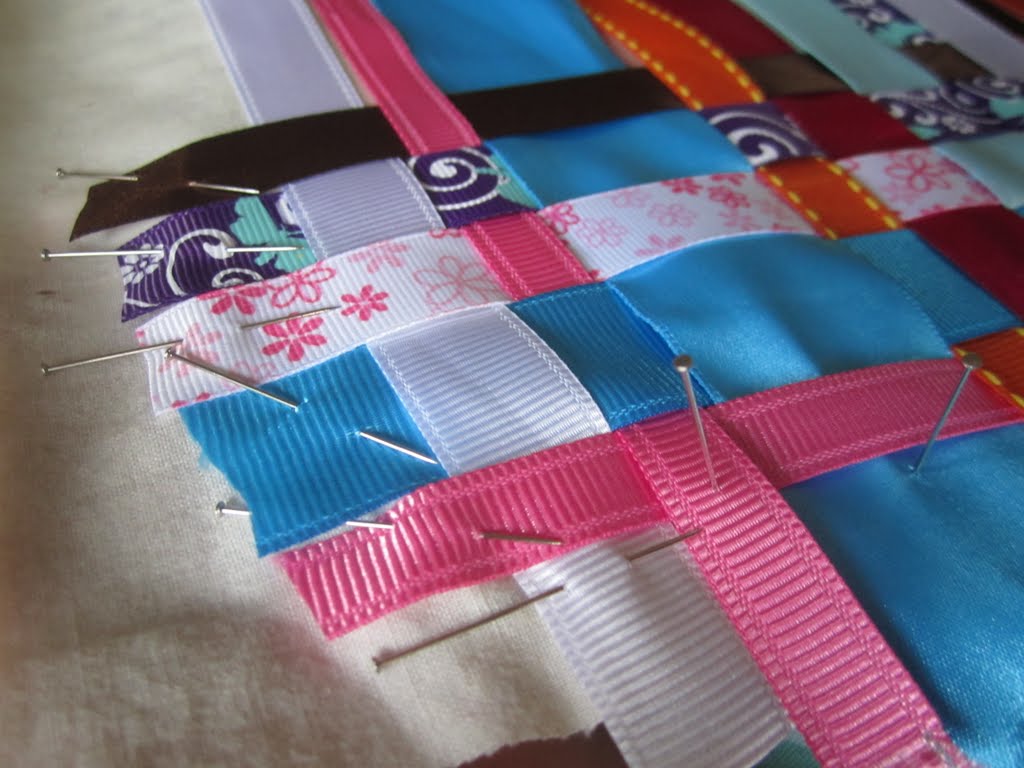
Line up all your ribbons and pin them down on both ends. I wanted to do mainly warm colors (orange, pink, red, brown, etc.) but included some blues, too. I changed my mind later and actually pulled most of the blue ribbons out of the finished weaving and re-weaved some different ribbons to keep the theme warmer.
Start weaving! I did just a basic weaving pattern: over, under, over, under, etc.
You can see better here how I pinned the ribbons down.
I finally finished weaving! This took me about 1.5-2 hours to finish--an entire naptime. You can see that I replaced the vivid blues with pinks, but left a few lighter blues.
Cover all the ribbon with an ironing cloth and iron away! Ironing was hard work. I found that I had to warm my iron up to medium high (rather than the medium that HeatnBond calls for) since there were so many layers to work with.
Not all of my ribbons bonded easily, so I did have to leave a few pins in here and there while I stitched. I sewed a line all the way around my heart outline, about a 1/4 inch to the outside of it. This line of stitching was just to hold it all in place.
Front side of the stitching.
Then I trimmed it up. Yay, it looks so pretty!
I took some pre-made satin binding and ironed it flat. I used that for the sides of my pillow. I was going to just sew the back of the pillow right to the front, but then I thought that adding a side (wall?) might make it a bit more fluffy. I also added an extra strip of muslin the same width as the satin to reinforce the satin. It seemed like a good idea, but it might have been overkill.
I sewed it all around the front (right sides together!). Then I sewed the back of the pillow on (right sides together again), leaving a gap of about 5 inches for turning. Before turning, I clipped and notched all the corners of the heart and ironed the seams over toward the front of the pillow. I tried turning it right side out without ironing the seam, but they were so stiff that they were deforming the pillow, so they needed a good ironing.
Turning it right side out!
Flat pillow from the back.
Flat pillow from the front. Almost done!
Stuff pretty stiffly since stuffing seems to squish over time and sew the gap closed with an invisible ladder stitch. All done!
All together, I think this project took me about 7 hours. So there's enough time between now and Valentine's Day for you to make one! ;)
If you shop at Hobby Lobby, they have these ribbon remnant bags in the ribbon-sold-by-the-yard section. Each bag has a bunch of ribbons that are each about 2 yards long. One of those bags is plenty for this project.
Happy sewing!
~Regina
Thursday, February 2, 2012
Thursday, January 26, 2012
Soothing Baby Rice Packs
One day a year or so ago, one of my friend posted a picture of these on facebook.
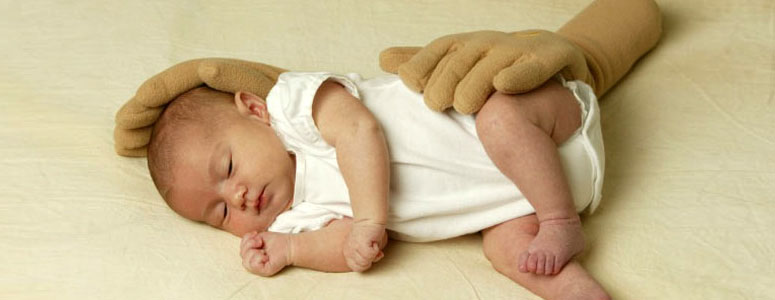
Admittedly, they're a bit freaky, but I thought that if we had another baby, something like this might come in handy. Well, after struggling with a baby who wouldn't sleep for longer than 45 minutes at a time, I decided it was time to try to make some weighted hands...
Our little guy slept for 3 hours this morning, I'm sure partly thanks to this slightly creepy fuzzy arm! :) He doesn't look happy, but that's because he was just waking up. He doesn't like waking up.
So, want to see how I made these hands that look like Grover lost his arms? ;) Here we go!
I took one of my old sweaters that I wasn't going to wear again. It's nice and soft and probably smells a bit like me, so I thought that would be good.
Trace a hand onto paper and cut it out. I decided to do an open and closed hand, just to see what each turned out like.
Trace the hands onto muslin, adding about 1/4 inch all around. Just be approximate with this, no need for perfection.
Turn the sweater inside out and pin the muslin onto the body. Make sure to go through both layers of the sweater because those are going to be the front and back.
Cut them all out to a workable size. I didn't cut right along the lines because the hands are such a complex shape, they would be hard to work with.
Then sew along the lines. I wasn't exact and that's ok, since we're turning these right side out and stuffing them. DO NOT sew the finger lines of the closed hand yet (unless you want to pick out a bunch of stitches like I did). ;)
Now you can cut the hand shapes out. No need to be exact with this either.
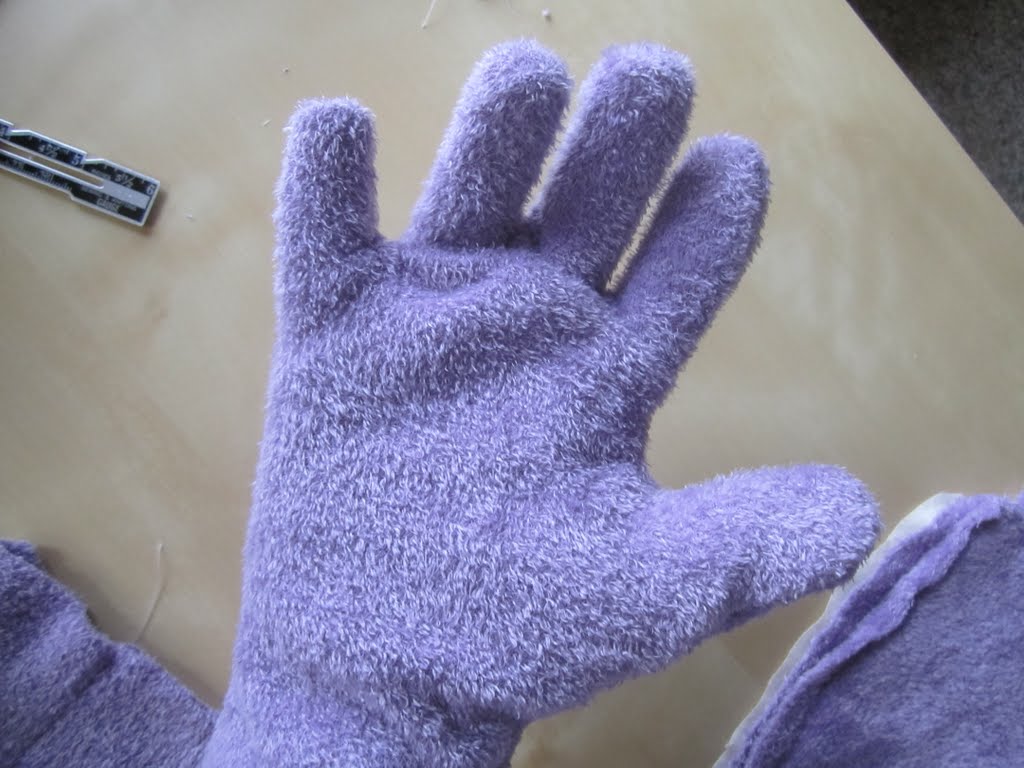
Turn them right side out and check them. My open hand's fingers were a bit short, so I went back and fixed that.
Much better.
Now you can mark where your finger lines end on the closed hand and sew them up from the top of "glove" to where your marker is. This is how I marked mine.
Now, you could just stuff those hands with rice, stitch them shut, and call it good. But I decided I wanted full arms since our little guy likes a bit more of a nest to sleep in. So I cut the sleeves off of the sweater--what was left of it--and matched them up.
They were a bit wide, so I stitched all along one side to make them a better fit.
Now this part is a bit confusing. You have your sleeve inside out and your hand right side out. Stuff the hand fingers first into the sleeve and pin the raw edges together. The right sides of the fabric are together and when you turn the whole thing right side out, the stitching will all be hidden. You'll get something like this, which isn't the prettiest, but it's about to be stuffed with rice. You end up with something looking like this.
Now decide what length you want your rice arms to be. Mine ended up being about 24 inches from finger tip to the end of the arm. I just folded the excess fabric into the arm rather than cutting it off, but do what works for you.
Time to add the rice! A canning funnel works well for pouring it in.
Fill each hand part way and then use a chopstick (or some other long thing with a blunt end) to help shove the rice into the fingers. It didn't want to go by itself, but this worked well.
I filled mine rather full, but they're each only about 2 lbs. Because of the stretchy fabric, they actually tend to look much flatter in "real life." I just ran a stitch across the opening--no pretty ladder stitch to hide the end. I hate hand stitching.
I keep these bunched up on a heating pad, waiting for the baby to go to sleep. I turn the pad on to the hottest setting whenever I start rocking him to sleep and they get just a bit warm in that time. A minute or so in the microwave (per arm) works well, too. You don't want to make them too hot, though. Be careful!
Here is our sweet baby waking up another time. See? He really loves them! And so do I!
Standard disclaimer: DON'T BE STUPID with these things. If you're using them with your baby, don't arrange them so that they could shift and suffocate your baby. Don't put too much weight on the baby's tummy or chest. Don't make them very hot or you could burn the baby. Use your common sense.
~Regina
Admittedly, they're a bit freaky, but I thought that if we had another baby, something like this might come in handy. Well, after struggling with a baby who wouldn't sleep for longer than 45 minutes at a time, I decided it was time to try to make some weighted hands...
Our little guy slept for 3 hours this morning, I'm sure partly thanks to this slightly creepy fuzzy arm! :) He doesn't look happy, but that's because he was just waking up. He doesn't like waking up.
So, want to see how I made these hands that look like Grover lost his arms? ;) Here we go!
I took one of my old sweaters that I wasn't going to wear again. It's nice and soft and probably smells a bit like me, so I thought that would be good.
Trace a hand onto paper and cut it out. I decided to do an open and closed hand, just to see what each turned out like.
Trace the hands onto muslin, adding about 1/4 inch all around. Just be approximate with this, no need for perfection.
Turn the sweater inside out and pin the muslin onto the body. Make sure to go through both layers of the sweater because those are going to be the front and back.
Cut them all out to a workable size. I didn't cut right along the lines because the hands are such a complex shape, they would be hard to work with.
Then sew along the lines. I wasn't exact and that's ok, since we're turning these right side out and stuffing them. DO NOT sew the finger lines of the closed hand yet (unless you want to pick out a bunch of stitches like I did). ;)
Now you can cut the hand shapes out. No need to be exact with this either.
Turn them right side out and check them. My open hand's fingers were a bit short, so I went back and fixed that.
Much better.
Now you can mark where your finger lines end on the closed hand and sew them up from the top of "glove" to where your marker is. This is how I marked mine.
Now, you could just stuff those hands with rice, stitch them shut, and call it good. But I decided I wanted full arms since our little guy likes a bit more of a nest to sleep in. So I cut the sleeves off of the sweater--what was left of it--and matched them up.
They were a bit wide, so I stitched all along one side to make them a better fit.
Now this part is a bit confusing. You have your sleeve inside out and your hand right side out. Stuff the hand fingers first into the sleeve and pin the raw edges together. The right sides of the fabric are together and when you turn the whole thing right side out, the stitching will all be hidden. You'll get something like this, which isn't the prettiest, but it's about to be stuffed with rice. You end up with something looking like this.
Fill each hand part way and then use a chopstick (or some other long thing with a blunt end) to help shove the rice into the fingers. It didn't want to go by itself, but this worked well.
I filled mine rather full, but they're each only about 2 lbs. Because of the stretchy fabric, they actually tend to look much flatter in "real life." I just ran a stitch across the opening--no pretty ladder stitch to hide the end. I hate hand stitching.
I keep these bunched up on a heating pad, waiting for the baby to go to sleep. I turn the pad on to the hottest setting whenever I start rocking him to sleep and they get just a bit warm in that time. A minute or so in the microwave (per arm) works well, too. You don't want to make them too hot, though. Be careful!
Here is our sweet baby waking up another time. See? He really loves them! And so do I!
Standard disclaimer: DON'T BE STUPID with these things. If you're using them with your baby, don't arrange them so that they could shift and suffocate your baby. Don't put too much weight on the baby's tummy or chest. Don't make them very hot or you could burn the baby. Use your common sense.
~Regina
Wednesday, January 18, 2012
Fancy Spit-Up Cloth
I've seen some lovely "travel sized" loveys and fancy blankets for sale here and there. I keep seeing them and thinking, "I could make that!." I hadn't gone to the trouble of trying to make one until I noticed that my super spitter-upper is beginning to cuddle with his spit-up cloths. Then inspiration struck: why not make a fancy, cuddly spit-up cloth?
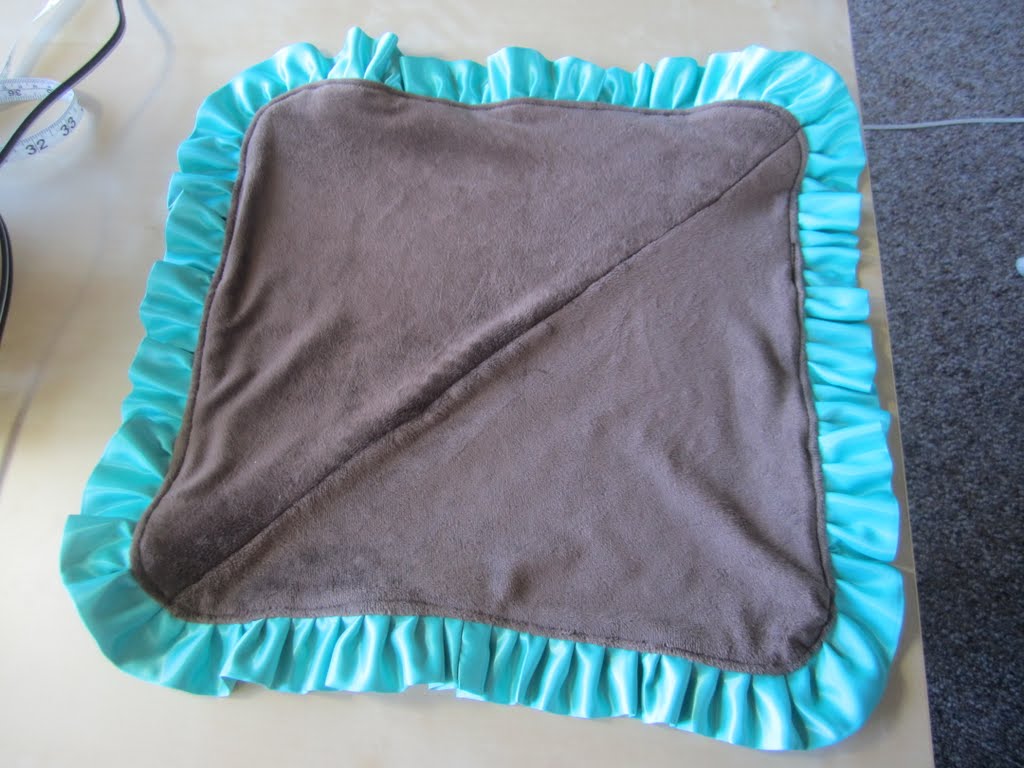
Since this was my first try, I just grabbed scraps from other projects. I pieced the soft microfleece back, used the leftover satin binding from making the baby's nubbie doll, and used the terry cloth liner from a cloth diaper that never got used (I got it for free as a sample). I trimmed everything down to the right size, added an appliqué to the terry cloth side of the cloth, and then set out to try out my new ruffler foot. Whee!
This thing is a beast. But actually, it just snapped onto my foot, so it wasn't as hard to get on as I thought it would be.
After reading the instructions through several times and fiddling with the settings, I got my ruffles to look about right. The ruffler didn't work perfectly (my needle kept getting knocked loose!), but it certainly worked better than the standard way of making ruffles.
I had to undo several ruffles to join the raw ends, but it was easy to re-fold the ruffles.
Pin, pin, pin, pin! Make sure to pin the ruffle pointing in so that when you turn the whole thing right side out, it points out.
Pin the other side to it, right sides together. Sew it all together, leaving a gap of 3-5 inches for turning.
Once it's all together, pull out the pins, and turn it all right side out.
Pin the hole, making sure all the layers are in line, and top stitch.
All done!
Yes, it look a bit girly, but a heart and a few ruffles never hurt a little boy... ;)
He actually loves it, though you couldn't tell it from this photo. ;)
~Regina
Since this was my first try, I just grabbed scraps from other projects. I pieced the soft microfleece back, used the leftover satin binding from making the baby's nubbie doll, and used the terry cloth liner from a cloth diaper that never got used (I got it for free as a sample). I trimmed everything down to the right size, added an appliqué to the terry cloth side of the cloth, and then set out to try out my new ruffler foot. Whee!
This thing is a beast. But actually, it just snapped onto my foot, so it wasn't as hard to get on as I thought it would be.
After reading the instructions through several times and fiddling with the settings, I got my ruffles to look about right. The ruffler didn't work perfectly (my needle kept getting knocked loose!), but it certainly worked better than the standard way of making ruffles.
I had to undo several ruffles to join the raw ends, but it was easy to re-fold the ruffles.
Pin, pin, pin, pin! Make sure to pin the ruffle pointing in so that when you turn the whole thing right side out, it points out.
Pin the other side to it, right sides together. Sew it all together, leaving a gap of 3-5 inches for turning.
Once it's all together, pull out the pins, and turn it all right side out.
Pin the hole, making sure all the layers are in line, and top stitch.
All done!
Yes, it look a bit girly, but a heart and a few ruffles never hurt a little boy... ;)
He actually loves it, though you couldn't tell it from this photo. ;)
~Regina
Subscribe to:
Posts (Atom)