Monday, January 31, 2011

Basic Dough Variation: Cinnamon Rolls!


First off, let me apologize for how long it has taken for me to get this recipe up. It's been a rough month, but we've moved to a new house and things are looking up. Once I dig us out of the piles of boxes and heaps of homeless things, we'll be good to go! :)

Cinnamon Rolls

1 tablespoon yeast
1 cup milk
3 tablespoons butter
1/3 cup sugar (can replace with 1/3 cup of honey)
1-2 teaspoons cinnamon
2 1/2-3 cups cups flour
1 teaspoon salt

Prep time: 3-ish hours
Oven: 375 degrees F
Bake time: 15-20 minutes
Yield: 2 dozen cinnamon rolls (1 9x13)

Note: I originally wrote this recipe out for a friend who didn't have a mixer, so that's why it's a bit different.

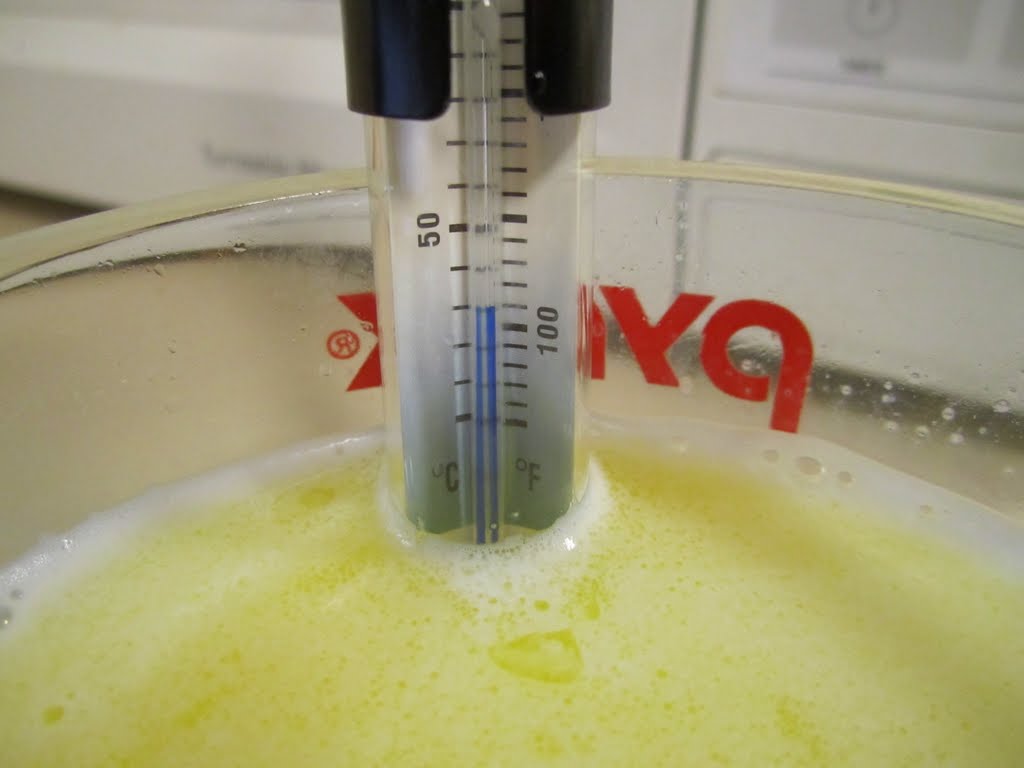
Measure your 1 cup of milk into a microwave-safe bowl and add the 3 tablespoons butter.  Microwave for about 1 minute--you want the butter to melt into the milk but you don't want it to get too hot!  I almost always kill my yeast the first time around on this by microwaving my milk and butter too long.  You'll need to stir the milk until the butter has melted completely. The thermometer in my mixture reads 105 F, but my thermometer reads 5 degrees low, so this is actually 110 degrees F.
Place yeast and sugar into a largish bowl (or your mixer's bowl) and pour the milk mixture over it.  You might want to let this mixture sit a while to make sure the yeast wasn't killed by the milk, but I don't necessarily do this.  Add flour, cinnamon, and salt (make sure to sprinkle the salt evenly to help with it mixing in). Remember, this dough is normally very soft, you'll want a slightly stiffer dough for rolling it out, so add a bit more flour to accomplish that.

Mix, mix, mix until the dough has come together into a fairly non-lumpy dough. It will be very soft, feel free to add flour until you like how it feels.  Turn out onto a floured surface and knead until the dough is smooth and elastic.  This should only take a few minutes and shouldn't be too difficult. (OR just turn on your mixer with the dough hook attachment and let it mix and knead the dough until it's smooth and elastic.)

Grease a large bowl and place your ball of dough into it, turning to coat. Cover with a wet towel and let rise in a warm place. I prefer to boil some water, pour it into a bowl, and put it in a warm oven with my uncovered bowl of dough--it works better for me.  This dough is very slooooow. I think mine took 2 hours on the first rise to double (note: it only took about an hour the second time I made this recipe). I did a second rise (out of necessity since I had to put my daughter down for her nap), which only took 30-45 minutes.

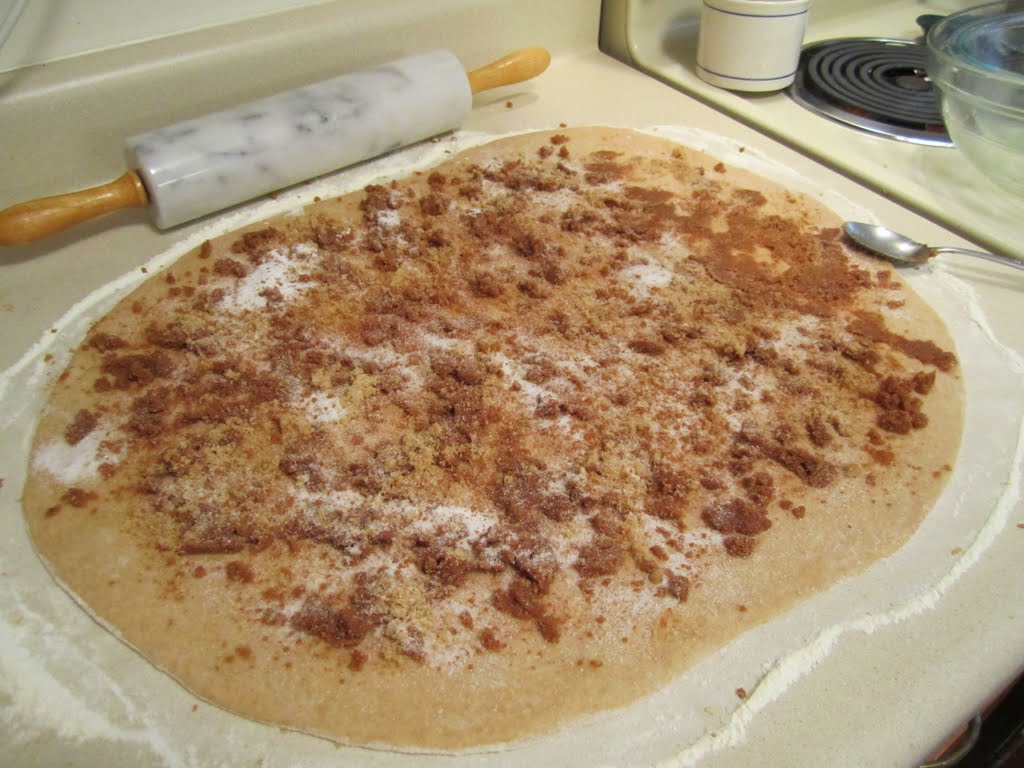
Once you've let your dough rise as much as you desire, turn it out onto a well-floured surface and roll out until thin. I made mine 1/8-1/4 inch thick (my piece of dough was 19ish by 14ish inches).  Now, for filling, I don't use any exact measurements.  I do about 1/2 cup soft butter, 1/3-1/2 cup brown sugar, 1/4 ish cup of white sugar, 1 tablespoon ish of cinnamon, and some flour if I feel like it. Sometimes I throw in some cloves and nutmeg, too. I mix it all together and sprinkle/rub it onto my dough.  If I don't like the coverage, I sprinkle more of the sugars and cinnamon over it all.


Starting at a long side, roll the dough up.  Now, for cutting, I prefer to use thread or floss, but a knife should work just fine.  With the thread, I run it under the roll of dough and cross it over the top and pull and it cuts nicely from all directions (make sense? Probably not unless you've done it before).  You'll want to cut the roll into 24 pieces.

Grease a 9x13 (or two 8x8s) and place the rolls into it.  Cover (or place in a warm oven with boiled water) and let rise until you like how much they've risen.  I let mine go 30-60 minutes, but they could go longer if you really want them fluffy.

Before rising:
 After rising:

Bake at 375 F for 15-20 minutes.  The tops of the rolls should be nice and brown.

Flip out onto a foil-covered cooling rack and allow to cool. Here's how I do it: place foil over the top of the pan, then put the rack over the foil. Grasp the pan's handles, foil, and rack on each side with hot pads and quickly flip it all over.
 Once you've got the whole thing inverted, slip a knife under one of the pan's handles and lift. Quickly grab the handle with a hot pad and lift it away from the rolls. They should all come right out without sticking, assuming that your pan is still nice and hot.
I don't do any icing or topping, but you certainly can. If so I suggest pouring it on while the rolls are hot. :)  The rolls will be gooey and sticky and slightly doughy in the middle. Enjoy once they're cool enough to touch! Careful not to burn yourself!

Feel free to post in the comments if you have any questions! If anything sounds confusing or odd, it's probably because I'm sleep-deprived; please, please, please point it out to me!

A special thanks to my friend Katrina for being my tester for this recipe! :)

~Regina

Tuesday, January 18, 2011

Dropped off the face of the earth...

I kind of disappeared into nothingness for almost a month. I've been sick off and on since the week before Christmas and our toddler has been teething (eye teeth and two year old molars), so besides being exhausted, I just haven't felt up to doing very much.

I've been thinking about this blog and what would work best for me. I had been trying to post twice a week, but have decided that it's too intense of a schedule for me. My goal for this blog is for it to be a repository of my ideas so that I can share them with others. I'm not looking to gain a huge following of people, I just want to make my ideas accessible to others.  However, I still need to work on posting regularly.  That being said, my goal will now be to post once a week. It may be a tutorial or it may just be an overview of what I've been up to.

So, let's see what this blog develops into over the next year.... :)
~Regina

Thursday, December 16, 2010

Fun Christmas Stuff Around our House

First off, we have our Christmas tree.  Now, with a very curious, active toddler, I was stumped as to what to do about ornaments.  Sure, they make those "unbreakable" ones, but neither my husband nor myself were sure that they would stand up to our daughter.  One day, we wandered around the discount store, looking for ideas when my daughter picked up a package of golden jingle bells and gave them a shake.  As I turned towards her to make sure she wasn't about to break anything, my eye caught another package of red jingle bells. And thus, our Christmas tree ornaments were found....

After bedtime and clean up, our tree looks like this:
During the day, it looks more like this, and this is on a good day:
The poor little bells spend more time on the floor than they do on the tree, but at least my daughter has fun running around shaking them!

Second, we have three ice wreaths that I had fun creating from various left-over craft supplies that we had laying (lying? I can't ever get those straight.) around.  The original idea is over here and she made some gorgeous wreathes!
Mine were mostly colored string and ribbon. Nothing special, but still fun.
This morning I noticed that the wreaths were "growing" icicles! How fun!
Third, we have our over-the-door swag thingie. ;)  It's just lights, ribbon, and glass ornaments. I'm rather pleased with how it turned out.
It was difficult to get a full picture of (daylight coming through the doors), so you'll just have to fill in the gaps...
Finally, since my daughter loves bells so much right now, I found some larger bells on sale at joann's and made a bell door knob hanger.  To do it, I learned how to loop braid ribbon and how to make korker spiral ribbon.  For loop braiding, you can do it with one color or two colors.  For the korker spirals, I found this blog and this blog most helpful.  Everyone had slightly different ideas about how to do them, but the idea is all the same, so I just mish-mashed it together and mine turned out great!
Well, my daughter is knocking on her bedroom door to be let up from "naptime."  Coming soon: how to make cinnamon rolls with my basic bread dough recipe! Mmmmm!

~Regina

Monday, December 13, 2010

Cloth Training Pants!

Just to warn you, this is one looooong tutorial.  I thought about breaking it up into two but it wasn't quite that long...

My almost two-year-old daughter decided that she no longer liked diapers and started refusing to wear them.  So we decided to gently introduce her to the idea of potty training.  To aid with that, I decided that she needed some training pants so that she could work on the concept of keeping her "panties" dry.  After much googling, I finally found this free pattern that I really liked.  It comes from the Nappy Network--DIY side of the site.  Here is the specific Wee Weka Knickers pattern in PDF format.  You can also get to the pattern by clicking on the Nappy Network link, scrolling down to the bottom of their page and finding their link that says "Wee Weka Pull-on training Knickers."

So, go print off the pattern, measure your kiddo to see how he or she compares to the pattern and modify the pattern accordingly.  For my daughter, I made four modifications:
1. I folded over the waist to make the elastic casing rather than sewing on a separate band--my daughter preferred a lower waist.
2. I cut the leg holes a little wider--she liked them to be looser.
3. I did not add cuffs around the leg holes--same reason as the above.
4. I added a small absorbent liner in the crotch area--my preference.

It took making 3 different panties to discover what my daughter liked. I highly recommend making one and modifying the pattern, making another one, modifying it, etc. until you find the right fit for your kiddo.  Here is my final pattern.  You can click on any of these pictures to see them larger.
I used fleece for the panties, but you can use any cloth that has a slight stretch.  Lay the dotted side of the pattern on the fold of your fabric and cut it out.  Make sure that your fabric's stretch runs across the pattern.  I tried to stretch (haha!) the fabric I got by cutting a few panties out with the stretch running the other way and my daughter refuses to wear those.  They just don't fit the same and seem to be too snug.  So don't be like me.
As you can see from the cutting board's measurements, each panty takes about a 15" by 11" piece of fabric.  It will take more if you are doing a separate waist band and leg cuffs.  To figure out the shape and size of the liner, I laid out my cut panty on a blank sheet of paper and traced the leg holes.  Then I rounded out the shape and cut it down a little so that it fit nicely inside the crotch area.
This is what I came up with: a little pad-shaped thing that is about 4" by 7".
I cut out a whole bunch of these from two old sweatshirts of my husband. I used two of these liners per diaper, but I could easily have done three for more absorbency.  I also made them fairly small, you could easily make them larger.
The liners are the first thing to get sewn in. Pin them...
And stitch them in!  I used my longest stitch and went around them twice.
I don't know if it really helps them be more secure or anything like that, but I really like how it looks from the outside of the panties.
Then I pinned up the sides and stitched them at 3/8ths inch seam allowance (rather than the 1/2 inch called for in the pattern). I wanted them to be a little looser than the original pattern's.
Also note that I used a straight stitch. Since I'm using fleece, it won't unravel, so I didn't need to zig-zag the edges.  If you are using a fabric that will unravel, make sure to zig-zag or serge the edges. Or you can do what I did with these to make them more pretty: a sort of half felled seam. 

This is a felled seam.  Basically, you stitch up the seam as normal, then cut one seam allowance shorter than the other, fold the longer one around the shorter and turn under the raw edge so that all raw edges are hidden. Then you stitch it all up.

What I did was stitch up my side seams as I just showed you and trimmed the back panel's seam allowance to be significantly shorter. Then I folded the front panel's seam allowance back over it, but I didn't fold the raw edge under.  I stitched it down just like that.  One raw edge is still showing and the other is hidden. I did this because I wanted the side seams to be a little more finished and flat so that they wouldn't bother my daughter's sensitive skin.  She's very sensitive to the way clothing rubs, so this flattened the potentially annoying seam so that she doesn't even notice it.  It also adds a nice finished touch to the panties.  Make sense?  Probably not, it was hard to catch with photos. Feel free to comment with questions!
Once I had the side seams all sewn up, I started on the waist band.  I simply folded the fabric over on itself about 1/2 inch and stitched it. I didn't do the separate waist band because I wanted the panties to be lower-cut.  But after using these for a while, I think that next time I make them, I will either add more height to the pattern when I cut them out or I will add the separate waist band like the original pattern tells us to do. These are cut just a bit too low. Or maybe my daughter grew since I made them, you never know!
I had the front of the waist band dip down a bit more to go under my daughter's little belly. I definitely like how this worked out.  Once they were all pinned, I stitched them up at 3/8ths inch.  Make sure to leave an unstitched hole in the waist band. This is where you'll thread your elastic!
So...your panties are basically all stitched up. This is what we have left to work with: panties, elastic and buttons.
Let's start with the buttons. I had 6 panties that my daughter needed to be able to tell front from back on. So I laid out my many colors of buttons and started choosing which ones to use.
I stitched them on with a zig-zag stitch, trimmed the thread, and dabbed fabric glue onto the threads to protect them from tiny hands that like to pull on threads.  Why did I do so many colors? Because I'm a glutton for punishment and love changing the thread out on my machine...just kidding. I just wanted lots of colors--nevermind that it was rather annoying to switch the colors out for the various buttons...
Then cut out your elastic.  I cut these at 14 inches for my daughter's 20-21 inch waist--they're a bit tight, so next time I'll cut them a bit looser.
Thread them through the waist band using a safety pin...
And stitch them!  I used a zig-zag stitch and went back and forth over them several times. I took the needle you see there out before I really started stitching. It was there to keep the overlap in place until I could get it under my presser foot.
My lovely elastic stitching job....
Stitch up the hole in the waist band and you're done!
I keep mine stacked in a convenient spot in our living room--right next to the cloth diapers/spit-up cloths that are used to clean up accidents.
And here's my little one (well, part of her) modeling her panties.  So cute!

There you go: how I modified a pattern to make my own cloth training pants.  Our potty training kind of isn't going anywhere, but hopefully yours will move along much better than ours!  My little girl seems to think her panties are cloth diapers and prefers them over our typical disposables.  I comfort myself with the fact that we're saving money on the disposables.... ;)

Feel free to leave a comment if you have any questions! The comments are moderated so I will see the questions no matter how long ago I posted this.

~Regina

Thursday, December 9, 2010

How to Shine Copper

So it's that time of the year where we all are cleaning everything--including the super random things like our teapot bottoms!  Yes, I cleaned the copper bottom of my teapot not too long ago.  This is what it looked like after I had scrubbed it, layered a baking soda paste on it and left that to sit, and scrubbed it some more.  Let me tell you, it looked much better than it had. I pretty much gave up hope on the last of the burned-on spots, but I wanted to make the rest of it look pretty.
So I went searching for some ideas on how to help my the copper bottom look even nicer.  I have a nifty little book from Reader's Digest that shares all sorts of creative, helpful uses for random stuff you might have around your house, so I checked there.  They suggested ketchup--which I have lots of!  Who with a toddler doesn't have lots of ketchup?  So I followed their instructions and glopped on a nice thick layer of ketchup and left the tea pot to sit for 30 minutes.
After 30 minutes, I eagerly wiped off  the ketchup to see if it had worked.  And look at that: the copper looks wonderful!  Too bad I couldn't get more of the black off, but at least the copper that is clean looks gorgeous!
You can even read the manufacturer's imprint--so the ketchup did help the stubborn black spots, too.  I was very pleased with this little trick.
I shined up the rest of my teapot and it looks gorgeous!  Now if only I can protect it from splatters from Christmas cooking....

~Regina