Friday, July 22, 2011

Strawberry Jam Using Apples and Citrus for Pectin

A good friend of mine found this recipe and inspired me to try it. It was a great recipe, but I had a really hard time figuring out some of the nuances (specifically the "mounding up") because there weren't any pictures! Oh pictures, how I love thee! ;)

However, please read the recipe and its post first before going through my post about it. She knows a lot more about canning and making this jam than I do. I pretty much just say the same thing she did, but with pictures. :)

So, for 8 cups (approximately) of strawberry jam, you need:
-5 tart apples (the tarter the more pectin they contain)
-1 lemon or lime
-8 cups strawberries, after removing the ends and roughly chopping them
-5 1/2 cups sugar

Remove the stem and blossom ends of the apples. Chop the rest of the apple coarsely (including the core and seeds!). Finely chop the entire lemon or lime, doing nothing but rinsing it off (yes, you want the peel and seeds!). Toss these into a pot and add just enough water to keep them from sticking to the pot. Don't stress about adding "too much" water because you can boil off any extra.
 Boil for about 20 minutes or until everything is nice and soft. (While you're boiling the apples and lemon, you'll want to prepare your strawberries, but I'll include those pictures later to keep the post less confusing.)
Once they're nice and soft and starting to look like applesauce, dump the apple mixture into a fine-mesh sieve and force the mixture into a bowl. All the peels and seeds and rough stuff should stay in the sieve. You should get about 2 cups of puree.

Now, while you're cooking the apple mixture, prep your jars and strawberries. I boiled my jars and lids since it had been a while since I had washed my jars.
 I took the tops off the strawberries, cut them into chunks...
 And threw them into the blender. I did this because I cannot stand chunks of fruit in my jam. I like smooth jam. If you don't mind chunks, then just roughly chop the strawberries.
Throw your strawberries, apple puree, and sugar into a large (deep is recommended) pot. The original post says that the mixture will foam a lot, but I haven't found that to be true. Maybe because I puree the strawberries? (Note: I've only made the recipe twice.)
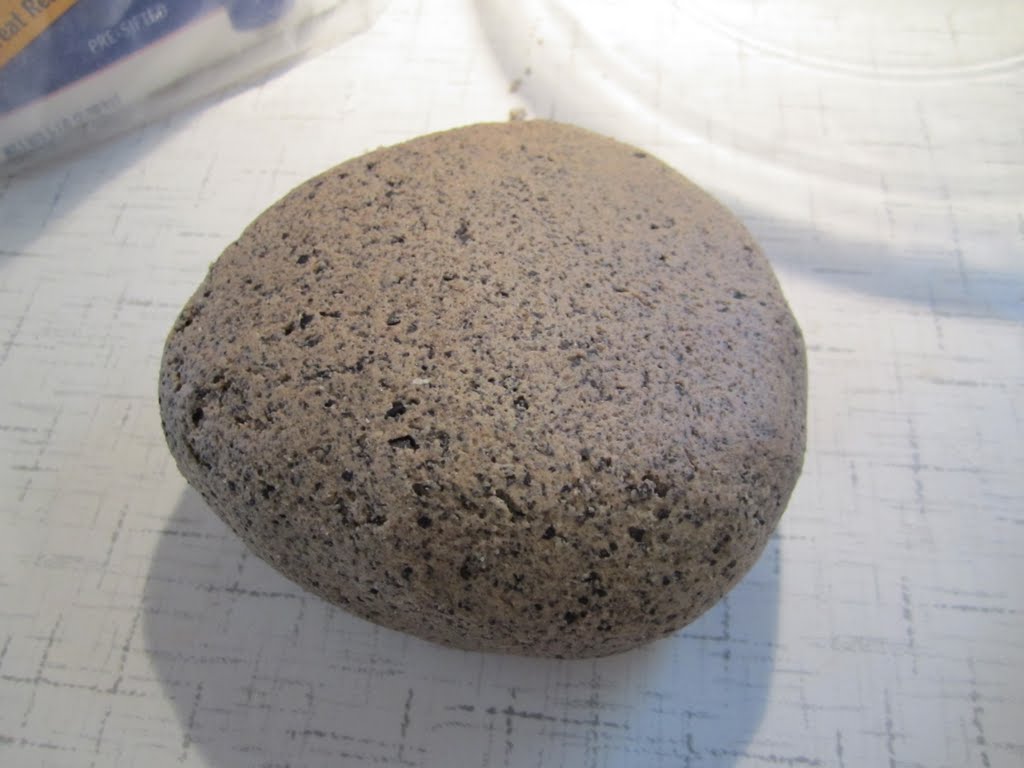
 Turn your stove onto medium heat and stir the mixture frequently. Once it reaches boiling, let it boil for about 20 minutes, still stirring frequently (if not more frequently!). Be careful of splashing jam! That stuff is like hot lava! :-/ The mixture should thicken and "mound up" on a spoon. That was the hard part for me to figure out.
 Does this count as mounding up? I think it does. Both times I have made the jam, I let it get to this point (second time I let it go a bit longer) and they seem equally set to me.
 Once I liked what I saw, I took the jam off the stove and poured it into my now dry, but still hot, jars (this is half the recipe pictured).
 Now you're going to process the jars in a water bath. I'm no canning expert, trust me, but it's pretty simple: put the lids on the jars and tighten them (but not super tight!), put them in a deep pot on a rack (or something to keep them off of the bottom of the pot), cover with water to at least 1 inch deeper than the lids of the jars, and bring the water to a boil. Let them boil for 10 minutes and then sit for another 5 (this last bit is not necessary, but prevents any hot jam from "spitting" out of an over-filled jar--I've never had it happen, but it sounds like a good idea to keep it from happening).
 Pull your jars out and let them sit undisturbed in a cool, dark place (or at least out of direct sunlight) for 24 hrs. If after 24 hrs, one or more of the lids hasn't "popped in" then you'll need to keep that jar in the fridge. Enjoy!
We went through 4 8oz jars of jam in about 5 weeks. Our little 3 person family. Yeah, we love this stuff. The second time I made the jam, I used a lime rather than a lemon and the jam seems to have a bitter after-taste to me. It's not bad, it just makes the jam not quite as wonderful as the first time. I doubt that this would be the case with every lime, we must have just gotten a bitter one. :-/

~Regina

Tuesday, July 12, 2011

Beautiful Butterfly Garland

I recently discovered Play at Home Mom's blog and facebook page. They have lots of great ideas for activities to do with your kids. What's really great is that their kids are about the same age or younger than our daughter, so the ideas are generally age-appropriate! Yay!

One of our favorite new activities is painting with liquid watercolor.
You add drops of concentrated liquid watercolor into water and start painting--very easy!

Our little artist's favorite thing to do is pour and mix the colors.
The paintbrushes are pretty cool, too, they're good for mixing the colors on the paper!
Most of our colors got mixed to look mostly purple. :)
Hanging up to dry!
Then I decided to do something fun: I rubbed both sides of the paper (it was 110 lb cardstock) with oil and sandwiched it with papertowels and heavy books to help the paper flatten again. The oil caused the paper to become slightly translucent. Then I traced butterflies onto the paper.
I cut them out...

And sewed them all together into a chain at different intervals.

Then we hung the butterflies up over our girl's bed. They turned out so beautifully!


She was thrilled with them and wants to make more. :)

So that's some of our summer fun around here!
~Regina

Thursday, July 7, 2011

The Grand Play-Dough Experiment: Coffee Play-Dough


Coffee Play-Dough

1 cup flour
1/2 cup salt
1 cup used coffee grounds
1/2 cup cool coffee (more or less depending on how wet/dry the grounds are)

Mix all ingredients thoroughly. Knead until an evenly combined ball. Store in a zip-lock bag after play.

My ingredients.
 Mixing the dries.

 Adding the coffee.
 Kneading and checking out the texture.
 Lots of residue!

Initial impressions:
-odd texture for play-dough (but I believe that's the point)
-doesn't have a particularly strong coffee smell (may depend upon the grounds)
-leaves a significant residue on the hands, but not on the play surface
-nice that it's an uncooked recipe (so you can include littles in making it)
-easy to make

Our little girl loved rolling it out.
 But wasn't thrilled about touching it.
 Cookie cutters didn't work very well.
 After a bit of storage and play:
-My daughter doesn't like the texture, so she had me touch it when she wanted to move it or something like that. She did enjoy rolling it out, though!
-Very, very wet after storage! We had to add a lot more flour to make it playable.
-Didn't do cookie cutters well.
-Left residue on hands and play area.

Final verdict: won't be making it again. Some kids and people might love the texture, but we certainly didn't. Plus, it was messy.

~Regina

Other posts in the Play-dough experiment series:
Kool-Aid Play-Dough
Traditional (Baking Soda) Play-Dough
Gingerbread Play-Dough

    Sunday, July 3, 2011

    Zucchini Oatmeal Chocolate Chip Cookies


    Zucchini Chocolate Chip Oatmeal cookies--a variation on the Nestle-Toll house chocolate chip cookies

    Mix together and set aside:
    2 1/4 cup regular flour (OR 1 1/4 cup regular flour and 1 cup whole wheat flour)
    1 teaspoon baking soda
    1 teaspoon salt
    4 cups rolled oats

    Cream together:
    1 cup (2 sticks) softened butter
    3/4 cup white sugar
    3/4 cup brown sugar

    Add to butter mixture and mix well:
    1 teaspoon vanilla
    2 large eggs (add one at a time and mix thoroughly after each)
    1 cup grated zucchini

    Slowly add in the dry ingredients. If the mixture looks too wet, add more flour (I had to add about 1/4 cup more flour).

    Once the mixture is well combined, add 1-2 cups chocolate chips, if desired.

    Drop by rounded tablespoonfuls onto ungreased baking sheets.  (Note: these in the photo were being put into the freezer, so that's why they're on wax paper.)

    Bake for 12-14 minutes at 375 F. I've found that cookies come out perfectly if you bake them only until the edges of the bottoms are lightly browned. The tops of the cookies will still be very pale, but they will be baked through when the bottoms are lightly browned. Let sit on the pans until cool to allow them to finish baking.


    Makes about 5-6 dozen, depending on how big you want them.

    Yummy!!

    ~Regina

    Friday, July 1, 2011

    Summer Fun

    It's been a busy couple of weeks. Between keeping up with our 2 1/2 year old, completing some much-needed sewing projects, and having my parents come to visit, I'm pretty exhausted. :) But on to the goodies...

    Every afternoon, I've been trying to do some "big" activity with our daughter. Three times a week, it's swimming, but the other days it's something creative outside. Stuff like sidewalk paint...
     To make sidewalk paint: combine equal parts cornstarch and water, mix well, add food coloring or liquid watercolors...
     Regular painting on big sheets of paper...
     And liquid water colors...
     Which can be turned into fun things like butterfly garlands!

    I've also had some fun sewing projects, like my husband's Father's day present: a "Don't Panic" beach towel! I learned how to machine appliqué with this project--time consuming, but not difficult.
     A new nightgown for our daughter. I had a pattern for this style, but the sizing was too small, so I used a stretchy fabric and used the pattern simply as a shape guide.
     I think it turned out wonderfully and can't wait to make another one for her! :)
     And curtains for our living room. I've had this fabric for over a year (lived in 3 different houses since buying it) and finally used it!
     The curtains turned out nice, but the slightly stretchy crinkle cotton was a pain and a half to work with. BUT I did learn how to use my rolled hemmer foot while sewing them, which I'm thrilled about.

    And, finally quite a few cooking or baking projects, like homemade strawberry jam using apples and lemons for pectin rather than store-bought pectin.
     Mmmmm! I made this jam a month ago and we've already eaten almost 3 out of the 4 8oz jars.

    And a totally random zucchini coffee cake using bisquick. I put 3 cups of grated zucchini into the bisquick recipe for an 8x8 pan. Next time I'll only do 2 cups of zucchini.
     I even put zucchini into the topping, too, which made it really wet...
     So I swirled it into the batter.
     I also had to bake it 15-20 minutes longer than called for (totally expected). So it bake for a total of 40-45 minutes. Oh, and yes, this is a 7x11 pan and I wouldn't use a pan any smaller for the zucchini-added cake.
     Yummy! The very bottom of the cake has that slightly pudding-y feel to it, which is nice, but I think that means I put in a bit too much zucchini.

    So, there's a sampling of what I've been up to over the past month. Busy, busy around here!

    ~Regina