Tuesday, August 30, 2011

Rocket Ship Playmat!

I've been consumed with getting ready for our new baby. As of today I am considered "full term" so the baby is now welcome to come whenever he wants to! I don't expect him to show up for another 3 or more weeks, but to celebrate this milestone, I managed to finish the playmat I've been working on for him. Yay!

I stared off knowing I wanted to do a space theme and it just kind of grew from there.

The fabric I used for the front...well, it's actually a plain Aden & Anais muslin swaddling blanket. I loved how it felt and since I had 3 that had fun prints on them, I decided to do something with the white one. To stabilize it, I put plain muslin behind it, adhered the two layers with a fabric adhesive and then added batting to the back of all of that. Then I appliquéd through all three layers. It seems to have worked really well. I did add some extra stitching around the edge of the mat to help keep the loose-weave of the top layer from unraveling, but with the binding, I'm pretty sure it's very secure. I probably should have done more research on using this kind of fabric, but... *shrug*


 I love how the fire turned out!
 Watery world! This one was a challenge to appliqué.
 A ringed world!
 And a couple stars....
 ...I put 19 of them on the mat and they were such a pain to appliqué! So many corners and turning of the quilt!! I nearly despaired of ever getting them done. :)
 The quilt back ended up being the biggest experiment. I had originally planned to use a simple blue patterned fabric and quilt the whole thing together with stars (yellow thread). I thought that that would look great. But I couldn't find a fabric that 1) was wide enough and 2) that had a nice pattern. I even looked at plain broadcloths, but couldn't find the right color blue.

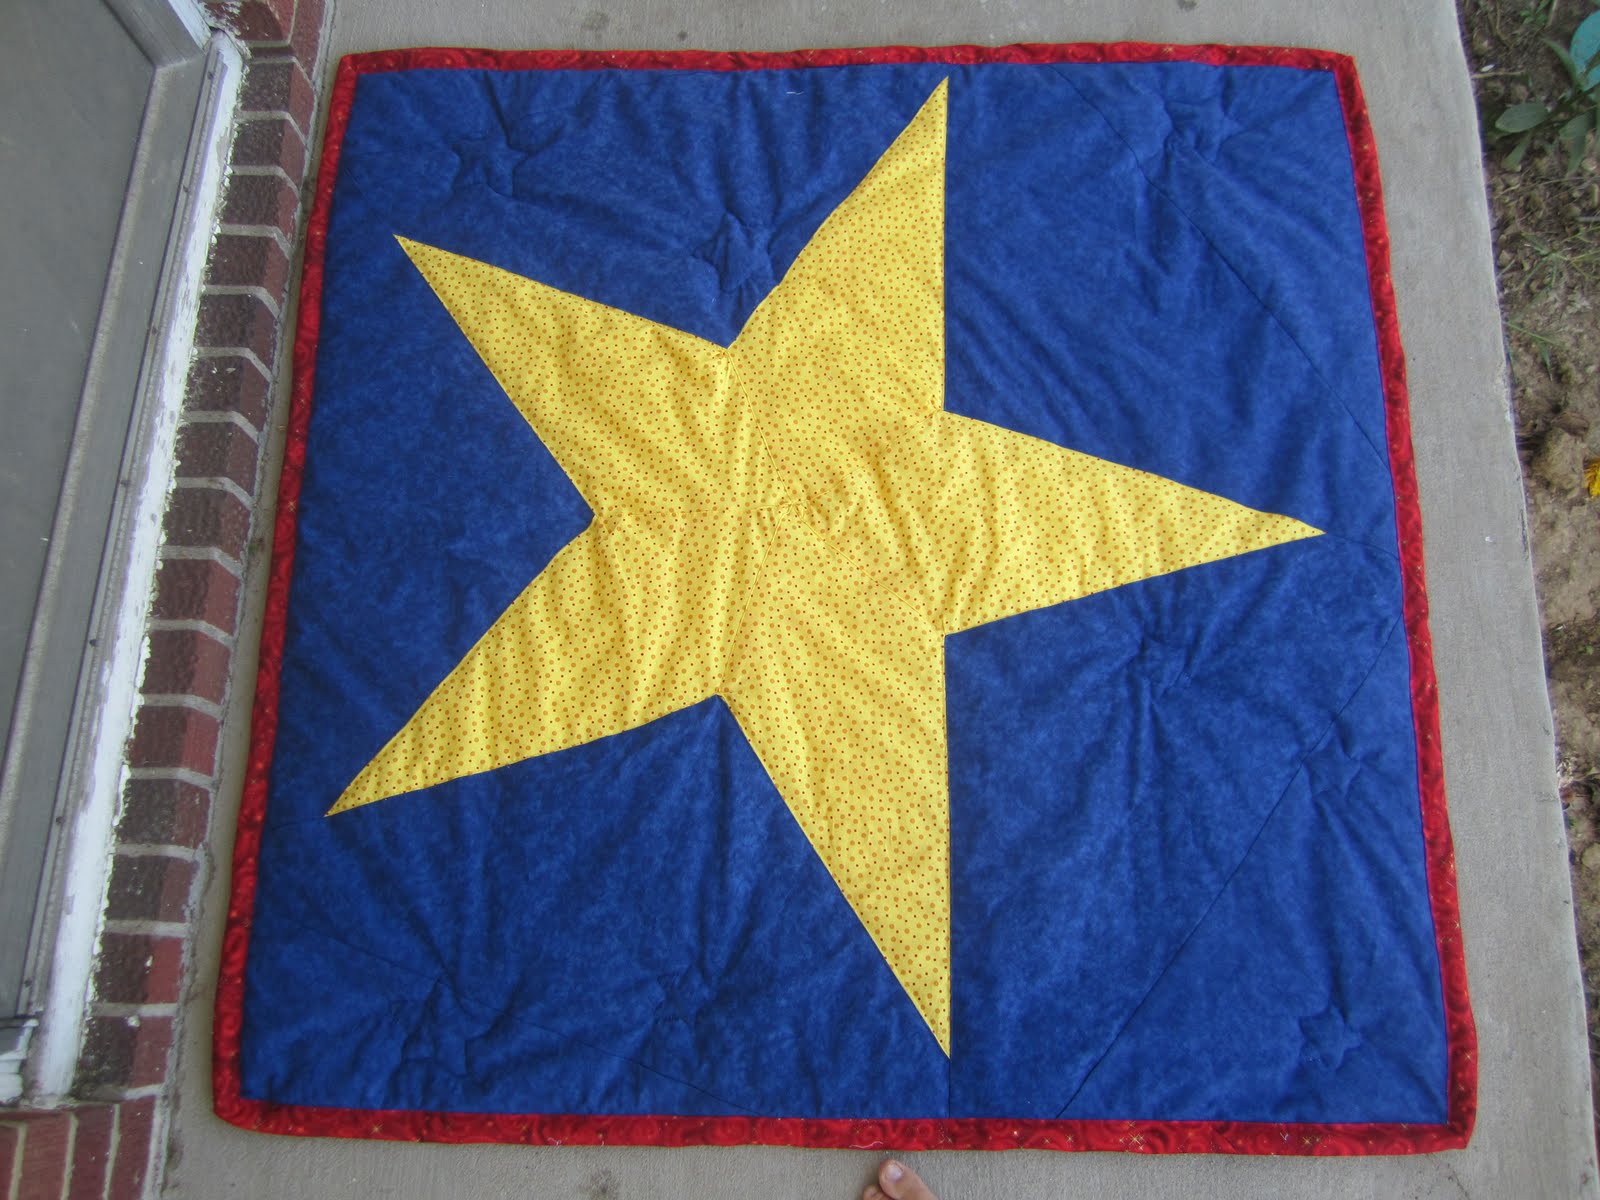
So I changed my plan and pieced together a huge star. I have never done any piecing before, much less something as complex as a star, so it was a challenge. The star didn't turn out perfectly, you can see that it's puckered here and there, but overall I'm pleased with it. Some of the other puckers you see in the blue fabric are actually star outlines--I stitched around some of the stars on the front to help quilt the back, but I couldn't do many because I didn't want to run over the big star on the back.
 I love the brilliant colors on the back, but my favorite fabric is the binding. It's a nice red, swirly pattern (from Robert Kauffman, if anyone cares) that is perfect for my space theme.

So the playmat is far from perfect but I am very, very proud of it. I hope it will be used for many years. :)

~Regina

(If I disappear for a while again, don't assume I've had the baby. I do plan to post when he decides to show up...I am, however, managing to stay busy or exhausted.)

Sunday, August 14, 2011

The Perfect Father's Day Present

Back before Father's day, I was trying to find the perfect gift for my geeky husband. I knew I had found the perfect gift when I saw this on thinkgeek.com. I knew I could make one that better fit my husband for a better price.

I took our daughter shopping and she picked out a large, orange towel. I was going to use a beach towel, but we ended up preferring the bath sheets. After a bit of messing, I figured out how to flip words backwards for printing onto the sewable heat-n-bond adhesive. I cut the paper into 8.5x11 inch pages and printed it out on the paper side of the adhesive.

I ironed the paper onto the wrong side of my letter fabric, being careful to follow the instructions. Iron-on adhesive can be picky, so really do follow the heat and time instructions. I've learned this the hard way.
I cut out the letters, peeled off the paper backing and worked on getting the positioning right. I worked on the lower word first because I thought that would be best. Once I had that right, I ironed it down and moved on to the upper word.
All ironed down and ready to sew!
I used black thread for the letters, but orange thread for underneath so that it didn't show up too badly on the back of the towel. If you're doing this, it's important to have your tension as close to correct as possible so that the upper black thread doesn't show through on the back side. :)
I used a zig-zag stitch that was pretty close to the buttonhole settings. I liked it nice and close. Here's how the letters turned out...

The back of the towel.
And the finished front!
My husband loved it. I hope that I can come up with something as perfect for next year! But maybe some of you can use this idea for your husbands or dads for the coming year. :)

~Regina

Sunday, August 7, 2011

Homemade Paints!

I've been trying out lots of fun activities with our little girl this summer. She loved painting with watercolor so much, that I decided to try more traditional paints.

Recipe here (scroll to the bottom)

Flour Fingerpaint

1 cup flour
2 tablespoons salt
1 1/2 cups cold water
1 1/4 cups hot water
Food coloring or tempera paint

Directions

1. Put flour and salt in saucepan.
2. Add cold water and beat with whisk or eggbeater until smooth.
3. Add hot water and boil until mixture is thick.
4. Beat again until smooth.
5. Color as desired with food coloring or powdered tempera paint.
6. Store covered in refrigerator.

My little girl watched me while I cooked the paint, then she got to help make the colors!
 She LOVED mixing the food colorings in.
 Finally, it was time to paint!
 She had to make sure that each paint brush matched the paint it was in as closely as possible...
 Finally, we got around to some painting. I had to show her "how" to paint.


 The paint didn't cover the paper quite as nicely as I would have liked. My daughter also wasn't as thrilled with this type of paint as she was with the water colors. I tried thinning out the paint the next time, but it didn't help her want to do it more. So the paints sat in our fridge for 6 weeks until I realized that they had started to grow mold. Yuck. I guess we need to buy non-perishable paint if we want to keep it around...

~Regina